|
When it comes to designing graphics for kids, typography plays an important role. Kids love reading and spelling out words. But the key to getting their attention is the design of the letters. If letters look boring, kids will immediately lose focus and attention. As a designer, it’s your job to make those titles and text look as fun as possible for kids. Today, we have some of the coolest kids fonts you can use to create fun graphic designs for children. You can use these fonts to design bright and attractive book covers, product packaging designs, clothing items, and much more. Have a look and start downloading. There are a few free fonts in the list too. 
This is a hand-crafted kids font that features a creative design inspired by dinosaurs, animals, and fun handwritten designs. It’s the perfect all-in-one font you can use to craft all kinds of things related to children’s books, clothing, mugs, school posters, and so much more. It comes with a set of dingbats as a bonus too. 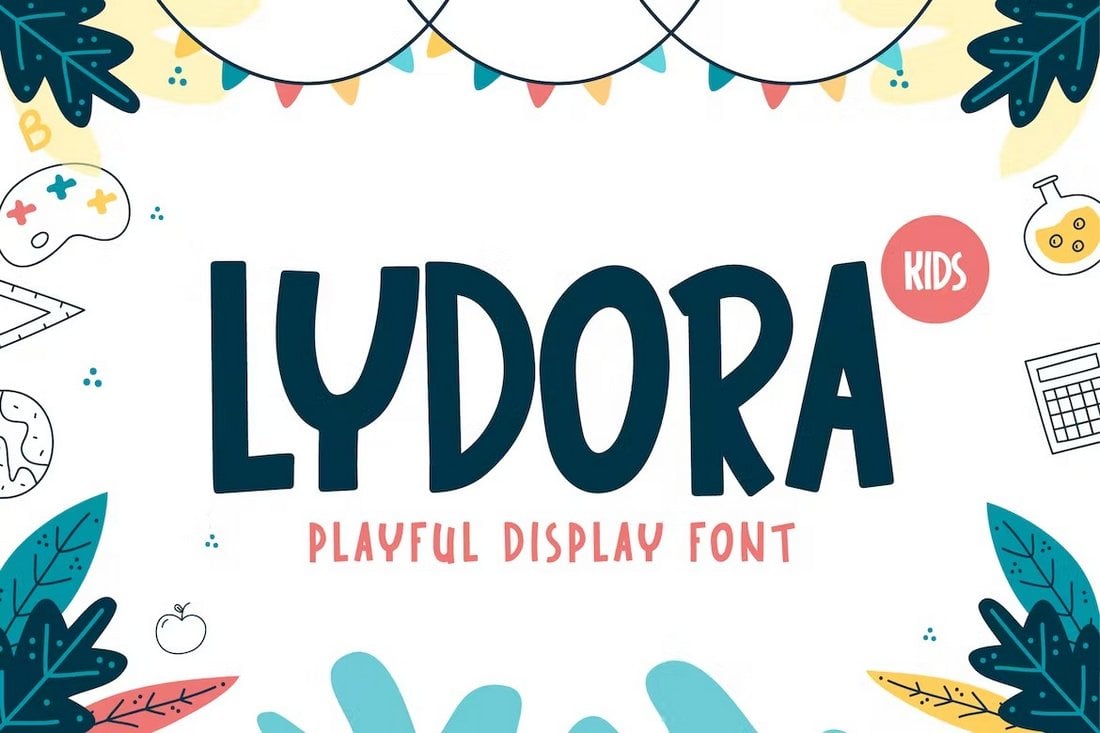
If you’re looking for a playful font that’s suitable for education-themed designs, this kids font is perfect for your project. It has a fun and simple look that will fit well with designs related to school, book covers, and other educational designs. The font includes all-caps letters with a set of alternate characters. 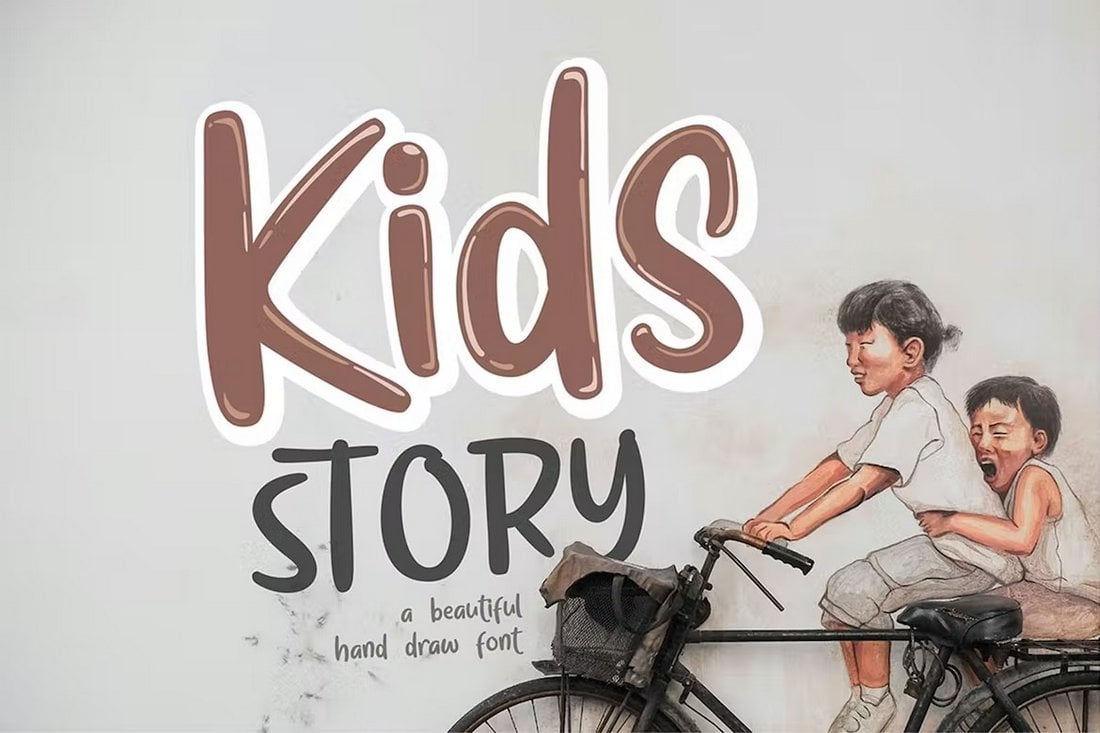
A font with a beautiful hand-crafted letter design that’s most suitable for children’s story books and book cover designs. This font has a creative hand-drawn design with each character telling a unique story. It includes both uppercase and lowercase letters. As well as ligatures and glyphs. 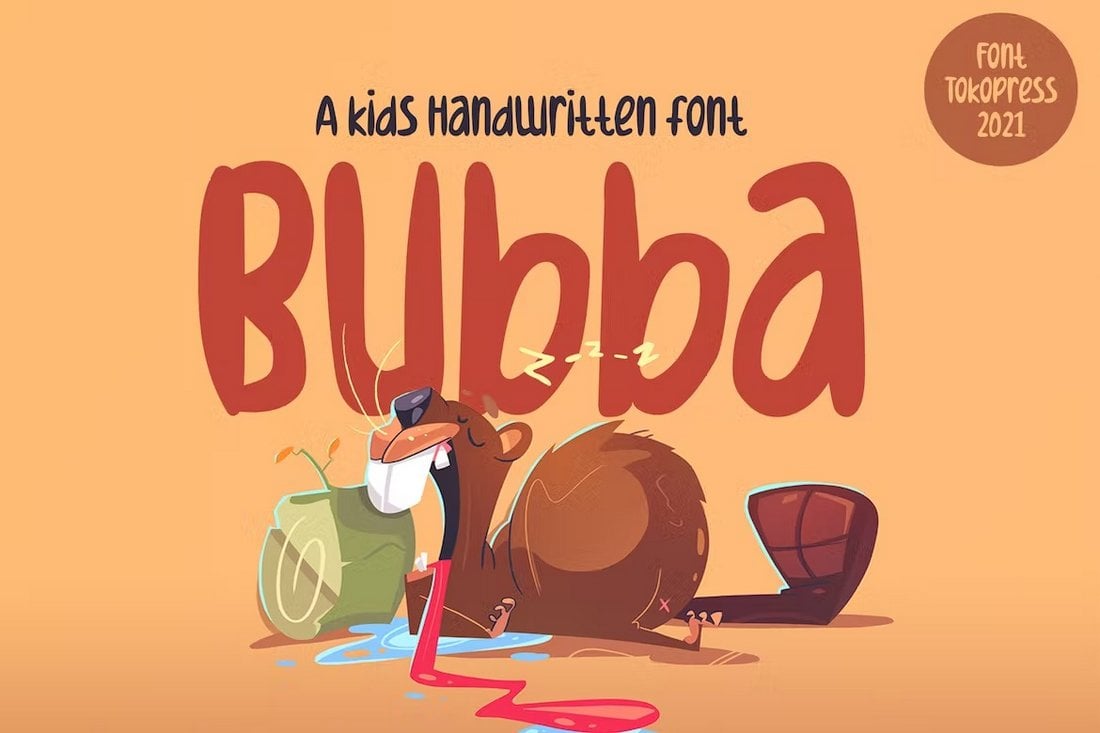
This is a fun cartoon-themed kids font that has creative letters that are perfect for designing titles for everything from school banners to video titles, kids’ games, social media posts, and more. The font includes uppercase and lowercase characters. 
Want to design big titles that grab attention from far away? Then be sure to use this font in your designs. It has big chunky letters that are made just for designing titles for posters and banners. Of course, you can use it to craft book covers, T-shirts, social media posts, and other types of designs too. 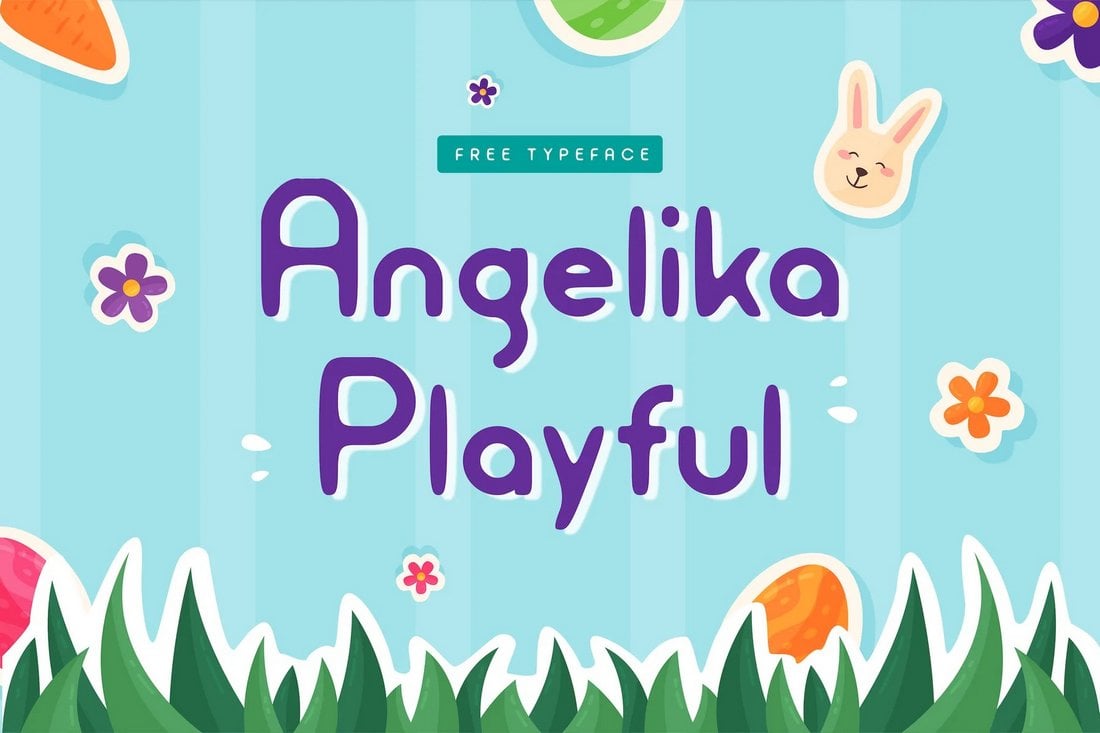
This is a free kids font you can use to craft adorable titles for many different types of designs. It features a unique style of letters with a fun look and feel. It’s free to use with personal and commercial projects. 
This font is also free for personal and commercial use. It has a thin line letter design with a cute handmade look to make your designs more attractive and appropriate for children. 
Dolpino is a cute font with a handwritten letter design. Each letter in this font has a unique shape that will make your titles and headings look even more adorable. The font has uppercase and lowercase characters as well as numbers and punctuation. 
The main goal of this font is to make your designs look more fun and kid-friendly. There are many different ways you can use it as well. It has a flexible style of letter design that will fit in with poster titles, banners, packaging designs, labels, and more. 
Even kids need some time off to recharge after a day full of activities. This font gives off that same vibe with its fun and relaxed design. It’s perfect for playful kids designs such as bedtime storybook covers, toy packaging, food packaging, posters, and more. The font includes lots of glyphs and ligatures too. 
A bold and creative kids font with a simple handwriting letter design. You can use this font to design many things, not just for kids but for grownups too. It has the perfect look for crafting logos, T-shirts, posters, labels, and more for various types of brands and products. The font includes stylistic alternate characters as well. 
It’s the perfect font for designing comic-style titles and headings for your designs. But that’s not all. This font is great for designing YouTube thumbnails, Facebook covers, custom T-shirts, book covers, and much more. It will add the perfect playful look to your designs, to grab the attention of kids and grownups. 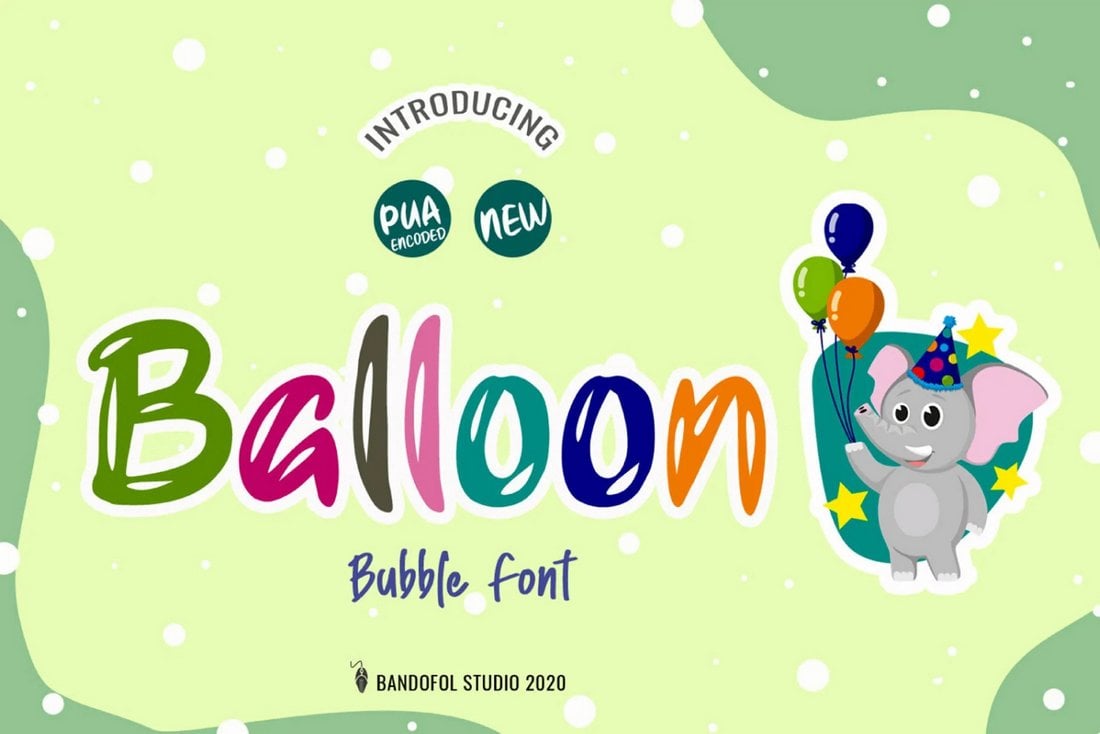
This free font features a fun textured design to make each letter look like a balloon. The font is perfect for all kinds of kid-friendly designs. You can use it for free with personal projects. 
You can use this font to craft space-themed titles and headers for your designs. It also has a fun comic-style look to add a casual look and feel. The font is free for personal use. 
Fruit Punch is a fun kids font with a set of modern characters. It features bold and creative letters that will immediately grab the attention of children and grownups alike. The font is perfect for product packaging designs, advertisements, and greeting cards. 
This font features bubble-style letters that are great for all kinds of designs related to kids. You can use it to design story books, posters, toys, and many other things for kids of all ages. The font features all-caps letters. 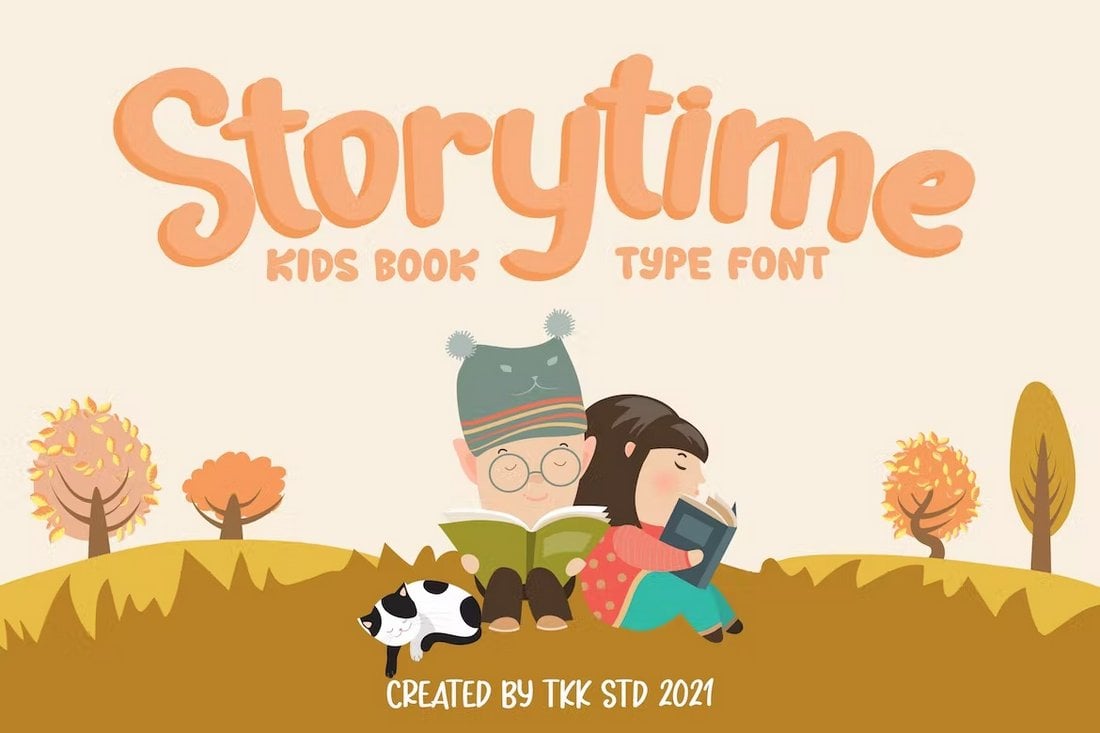
Just as the name suggests, this kids font is most suitable for designing children’s story books, CD covers, and workbooks. The font comes with adorable characters that are designed in the style of children’s handwriting. It includes both uppercase and lowercase letters too. 
Childart font is designed to bring out creativity in kids. It has a playful and fun letter design that will fit in well with children’s drawing books, art posters, school banners, and many other education-themed designs. This font also comes with uppercase and lowercase characters. 
Castle Rock is a fun kids font featuring a cartoon-style letter design. This font can be used to craft posters, T-shirts, book covers, titles for videos, and even video games. It especially looks great when used with textures and patterns so experiment with different styles to find the perfect look for your project. 
This font comes with a unique style of letter design that looks different but it will surely grab the attention of children as each letter looks fun. The font includes all-caps letters with creative letters. It’s free to use with personal projects. 
Playkidos is another free font you can use to craft cool titles for various kids designs. It comes with tall and narrow letters with playful layouts. It’s free for personal use. 
This kids font is perfect for all types of designs related to education from school banners to book covers, posters, and even school website designs. The font comes with uppercase and lowercase letters along with alternate character sets that feature rounded edges and another outline version. 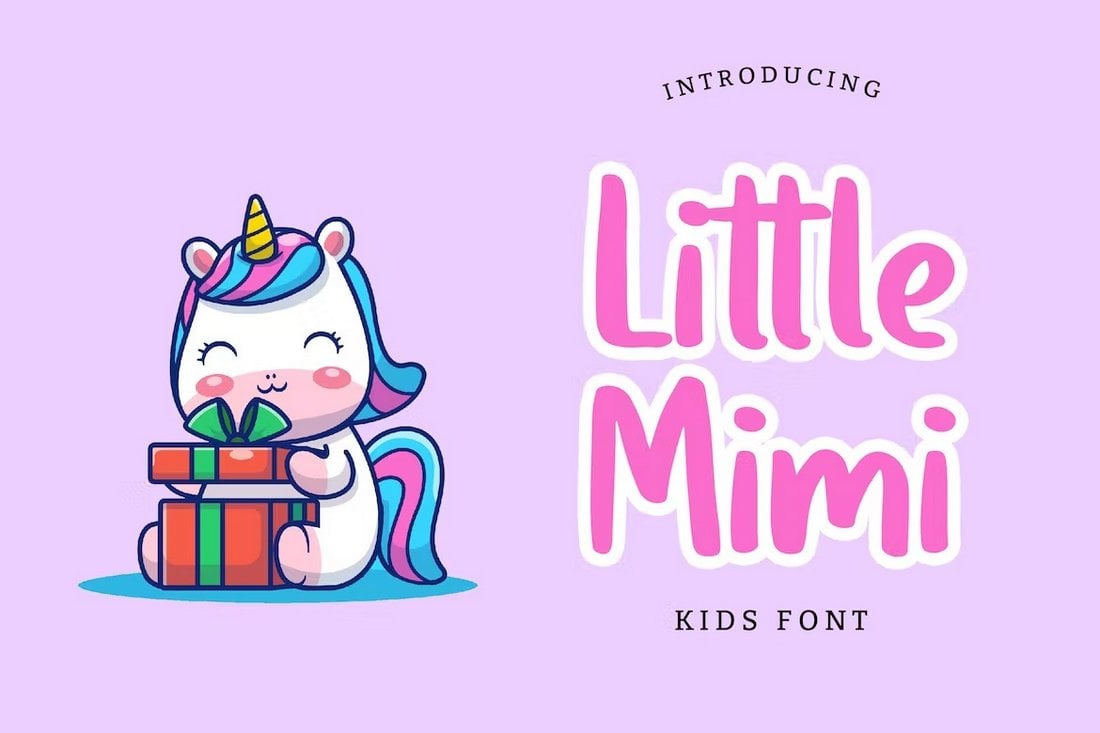
This is one of the most adorable-looking fonts on our list. It just has the cutest and most innocent-looking set of characters ever. This font is great for greeting card designs, packaging designs for kid’s products, storybook covers, and everything in between. 
If you want to give a hand-drawn look to your typography to make text look like they were drawn by a child, this font is the perfect font for your project. It has a creative handwriting letter design with child-like strokes. The font includes uppercase and lowercase letters as well. 
This font comes with funny-looking characters with chunky designs. These letters look wild and weird, the best ingredients for crafting big titles that attract the attention of kids. It’s great for book covers, video titles, posters, and more. 
Even though this font is designed inspired by children’s typography and drawings, it has the perfect minimalist look for designing modern T-shirts, posters, and website headers. You can use it with design projects for both kids and grownups. 
This font lives up to its name by giving you a set of letters that look like blobs. It’s a fun-looking font to use in all kinds of kids designs. The font comes in two styles featuring filled and outlines letters. For more great fonts, you can check out our best cartoon fonts collection. via Pixel Lyft https://ift.tt/aJ8cBWL
0 Comments
Machine learning (ML) and artificial intelligence (AI) are big news. They’ve been asked to everything from drive cars to predict civil war—so it’s no surprise to see the technology being applied to graphic design. But exactly how AI and design will work together remains to be seen. Supporters claim they will augment design and free up creatives to produce even better work. Critics say they’ll leave designers out of jobs and start a race to the bottom. So who’s right, and what do ML and AI have to do with graphic design? What is the difference between artificial intelligence and machine learning?
|


| Chrome | Firefox | IE | Edge | Safari |
|---|---|---|---|---|
| 108* | 89 | No | 105* | TP |
Mobile / Tablet
| Android Chrome | Android Firefox | Android | iOS Safari |
|---|---|---|---|
| 105* | 104 | 105* | 16.1 |
Use animated WebP
The WebP image format was introduced by Google in 2010. WebP, including animated WebP, has broad browser support.

<img src="https://css-tricks.com/gifs-without-the-gif-the-most-performant-image-and-video-options-right-now/nyancat.webp" alt="A cat flying through space leaving a rainbow trail">
Desktop
| Chrome | Firefox | IE | Edge | Safari |
|---|---|---|---|---|
| 32 | 65 | No | 18 | 16.0 |
Mobile / Tablet
| Android Chrome | Android Firefox | Android | iOS Safari |
|---|---|---|---|
| 105 | 104 | 4.2-4.3 | 14.0-14.4 |
Use animated AVIF
WebP is now twelve years old. The more modern AV1 Image File Format (AVIF), released in 2019, is the best image format for most use cases on the web. Converting a .gif file to AVIF can reduce bytes by over 90%.
<img src="https://css-tricks.com/gifs-without-the-gif-the-most-performant-image-and-video-options-right-now/nyancat.avif" alt="A cat flying through space leaving a rainbow trail">
As its name suggests, AVIF is based on the the AV1 video codec. Like WebP, AVIF can be used for both still images and animation. There’s not much difference between an animated AVIF file and an AV1 video in an MP4 container.
You can put a shadow on AVIF animation, e.g.:
filter: drop-shadow(2px 4px 6px black);
AVIF is already supported by Safari, Firefox, Samsung Internet, and Chrome. Firefox only shipped support for still images, not animated AVIF. Safari supports animation as of version 16.1. Unfortunately, because Firefox does support AVIF, just not animated AVIF, it’s impossible to successfully use the <picture> element to display AVIF only to browsers that support animation. Given the following code, Firefox would display the AVIF, but as a static image, rather than showing the animated WebP version:
<picture>
  <source srcset="https://fonts.gstatic.com/s/e/notoemoji/latest/1f4a9/512.avif" type="image/avif">
  <img src="https://fonts.gstatic.com/s/e/notoemoji/latest/1f4a9/512.webp" alt="💩" width="32" height="32">
</picture>
Tooling for AVIF is still improving. Video editing software does not enable you to export footage as animated AVIF or animated WebP. You’ll need to export it in some other format and then convert it. On the website ezgif.com you can upload a video file or a .gif and convert it to AVIF or WebP. You could also use FFmpeg. Using Cloudinary you can upload a video file or an old .gif and convert it to pretty much any format you want — including animated WebP and animated AVIF. As of time of writing, Squoosh, an image conversion app, doesn’t support animated AVIF.
Adoption remains lacking in design software. When viewing a prototype, Figma will play any animated GIFs included in the design. For AVIF, by contrast, you can’t even import or export a still image.

Use a video with an <img> element
In 2018, Safari 11.1 gave developers the ability to use a video file as the source of the HTML <img> element. This works in Safari:
<img src="https://css-tricks.com/gifs-without-the-gif-the-most-performant-image-and-video-options-right-now/cat.mp4" alt="A Siamese cat walking in a circle">
All the same codecs that Safari supports for <video> are supported by <img>. This means you can use MP4, H.264, and HEVC.
In Safari, video files will also work anyplace in CSS where you could use an image, like background-image or border-image:
.video-border {
  border: 40px solid transparent;
  border-image: url(abstract_bg_animation.mp4) 100 round;
}
One strange consequence of this feature in Safari is that the poster image of a <video> element can also be a video. The poster will autoplay even if you have blocked video’s from auto-playing. Safari claimed this feature came with performance benefits, not just over using .gif files but also over using the <video> element. According to Apple:
By placing your videos in
<img>elements, the content loads faster, uses less battery power, and gets better performance.
Colin Bendell, co-author of O‘Reilly’s High Performance Images, wrote about the shortcomings of the <video> tag for our use case:
Unlike
<img>tags, browsers do not preload<video>content. Generally preloaders only preload JavaScript, CSS, and image resources because they are critical for the page layout. Since<video>content can be any length – from micro-form to long-form –<video>tags are skipped until the main thread is ready to parse its content. This delays the loading of<video>content by many hundreds of milliseconds.[…]
Worse yet, many browsers assume that
<video>tags contain long-form content. Instead of downloading the whole video file at once, which would waste your cell data plan in cases where you do not end up watching the whole video, the browser will first perform a 1-byte request to test if the server supports HTTP Range Requests. Then it will follow with multiple range requests in various chunk sizes to ensure that the video is adequately (but not over-) buffered. The consequence is multiple TCP round trips before the browser can even start to decode the content and significant delays before the user sees anything. On high-latency cellular connections, these round trips can set video loads back by hundreds or thousands of milliseconds.
Chrome has marked this as “WontFix†— meaning they don’t intend to ever support this feature, for various reasons. There is, however, an open issue on GitHub to add it to the HTML spec, which would force Google’s hand.
Respecting user preferences
Video has the benefit of automatically respecting a users preferences. Firefox and Safari allow users to block videos from automatically playing, even if they don’t have any audio. Here are the settings in Firefox, for example:

The user can still decide to watch a certain video by right-clicking and pressing play in the menu, or enable autoplay for all videos on a specific website.

For users who haven’t disabled autoplay, it’s nice to have the option to pause an animation if you happen to find it annoying or distracting (a user can still right-click to bring up the pause option in a menu when video controls aren’t shown). Success Criterion 2.2.2 Pause, Stop, Hide of the WCAG accessibility guidelines states:
For any moving, blinking or scrolling information that (1) starts automatically, (2) lasts more than five seconds, and (3) is presented in parallel with other content, there is a mechanism for the user to pause, stop, or hide it unless the movement, blinking, or scrolling is part of an activity where it is essential.
With the <video> element, you’ll achieve that criterion without any additional development.
There’s also a “reduce motion†user setting that developers can respect by reducing or removing CSS and JavaScript web animations.

You can also use it to display a still image instead of an animation. This takes extra code to implement — and you need to host a still image in additional to your animated image.
<picture>
  <source
    srcset="https://css-tricks.com/nyancat.avifs"
    type="image/avif"
    media="(prefers-reduced-motion: no-preference)"
  />
  <img src="https://css-tricks.com/gifs-without-the-gif-the-most-performant-image-and-video-options-right-now/nyancat.png" alt="Nyan cat" width="250" height="250" />
</picture>
There’s another downside. When using the <picture> element in this way if the user has checked “reduce motionâ€there’s no way for them to see the animation. Just because a user prefers less animation, doesn’t mean they never want any — they might still want to be able to opt-in and watch one every now and then. Unlike the <video> element, displaying a still image takes away that choice.
Checking for progressive enhancement
If you want to check that your <picture> code is properly working and fallback images are being displayed, you can use the Rendering tab in Chrome DevTools to turn off support for AVIF and WebP image formats. Seeing as all browsers now support WebP, this is a pretty handy feature.

While it’s usually the best option to create animations with CSS, JavaScript, DOM elements, canvas and SVG, as new image and video formats offer smaller files than what was previously possible, they become a useful option for UI animation (rather than just nyancat loops). For one-off animations, an AVIF file is probably going to be more performant than importing an entire animation library.

Lottie
After Effects is a popular animation tool from Adobe. Using an extension called Bodymovin, you can export animation data from After Effects as a JSON file.
Then there’s Lottie, an open-source animation library from Airbnb that can take that JSON file and render it as an animation on different platforms. The library is available for native iOS, Android, and React Native applications, as well as for the web. You can see examples from Google Home, Target, and Walgreens, among others.
Once you’ve included the dependency you need to write a small amount of JavaScript code to get the animation to run:
<div id="lottie"></div>
const animation = bodymovin.loadAnimation({
  container: document.getElementById('lottie'),
  path: 'myAnimation.json',
  renderer: 'svg',
  loop: true,
  autoplay: true,
})
You can optionally change those settings to only play after an event:
const lottieContainer = document.getElementById('lottie');
const animation = bodymovin.loadAnimation({
  container: lottieContainer,
  path: 'myAnimation.json',
  renderer: 'svg',
  loop: true,
  autoplay: false,
  })
// Play the animation on hover
lottieContainer.addEventListener('mouseover', () => {
  animation.play();
});
// Stop the animation after playing once
animation.addEventListener('loopComplete', function() {
  animation.stop();
});
Here’s a cute example of a cat typing on a keyboard I took from Lottiefiles.com (the website is a useful website for previewing your own Lottie JSON file animations, rather than needing to install After Effects, as well finding animations from other creatives):
You can also programmatically play an animation backwards and change the playback rate.
If you do choose to use Lottie, there’s a Figma plugin for Lottie but all it does is convert JSON files to .gif so that they can be previewed in prototyping mode.
Abd what about Lottie’s performance? There’s size of the library — 254.6KB (63.8 gzipped) — and the size of the JSON file to consider. There’s also the amount of DOM elements that get created for the SVG parts. If you run into this issue, Lottie has the option to render to a HTML <canvas>, but you’ll need to use a different version of the JavaScript library.
const animation = bodymovin.loadAnimation({
  container: document.getElementById('lottie'),
  path: 'myAnimation.json',
  renderer: 'canvas',
})
Lottie isn’t a full replacement for gifs. While After Effects itself is often used with video clips, and Lottie can render to a HTML <canvas>, and a canvas can play video clips, you wouldn’t use a Lottie file for that purpose. Lottie is for advanced 2D animations, not so much for video. There are other tools for creating complex web animations with a GUI like SVGator and Rive, but I haven’t tried them myself. 🤷â€â™‚ï¸
I wish there was a TL;DR for this article. For now, at least, there’s no clear winner…
via Pixel Lyft https://ift.tt/wQErIdf
Wix is one of the best platforms you can use to show off your work with an online portfolio website.
Wix is much more affordable than other online website-building platforms and it offers an impressive collection of pre-made portfolio site templates for you to find the perfect design.
Today, we handpicked the very best of Wix portfolio templates. This collection will help you find inspiration to design your own portfolio website. It includes Wix portfolio examples for all kinds of creatives and professionals.
Explore all the templates below and be sure to check out the guide at the end to learn how to create a portfolio website on Wix.
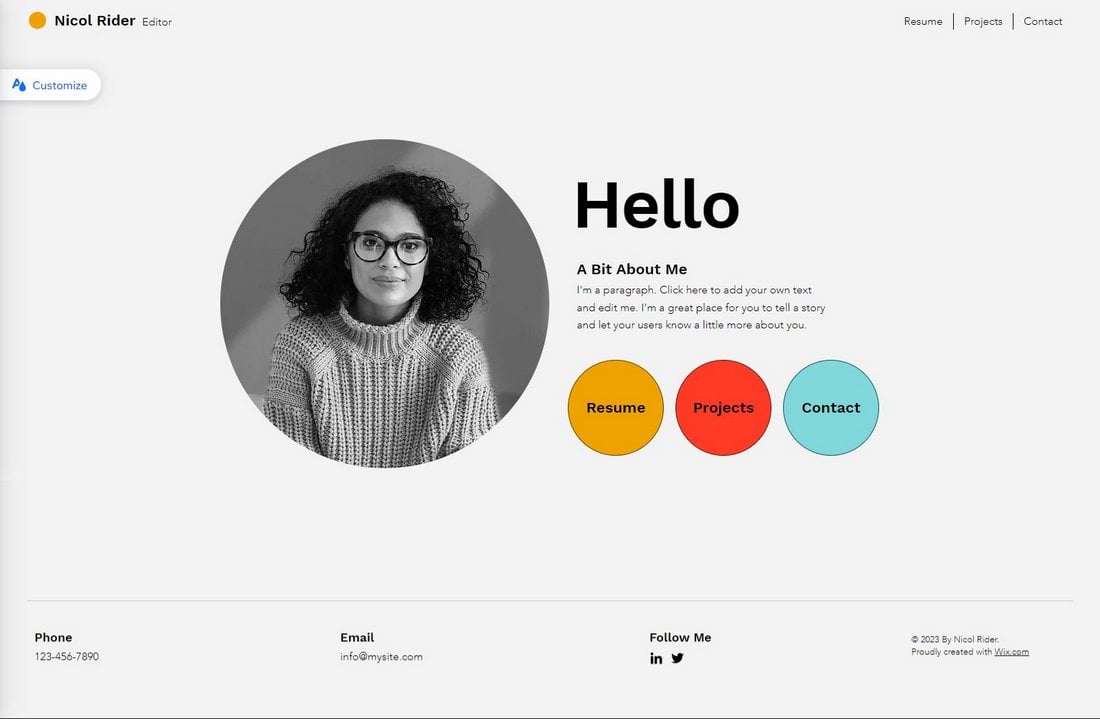
A simple and minimal design is the best approach for creating an online CV website. Just like what you see on this template.
You can use this Wix portfolio template to make a CV-style website to present your work to potential clients. It doesn’t have a long scrolling page or lots of design elements. But there’s space to introduce yourself with links to your resume and projects. And that’s just what you need to make an effective CV website.

When it comes to making portfolio websites for business professionals, you have to take a more decent approach in terms of design.
This Wix portfolio template follows the same concept with its modern and business-oriented design. It has a simple layout with sophisticated elements to give the website a more professional look and feel. There are also separate pages for your resume and projects too.

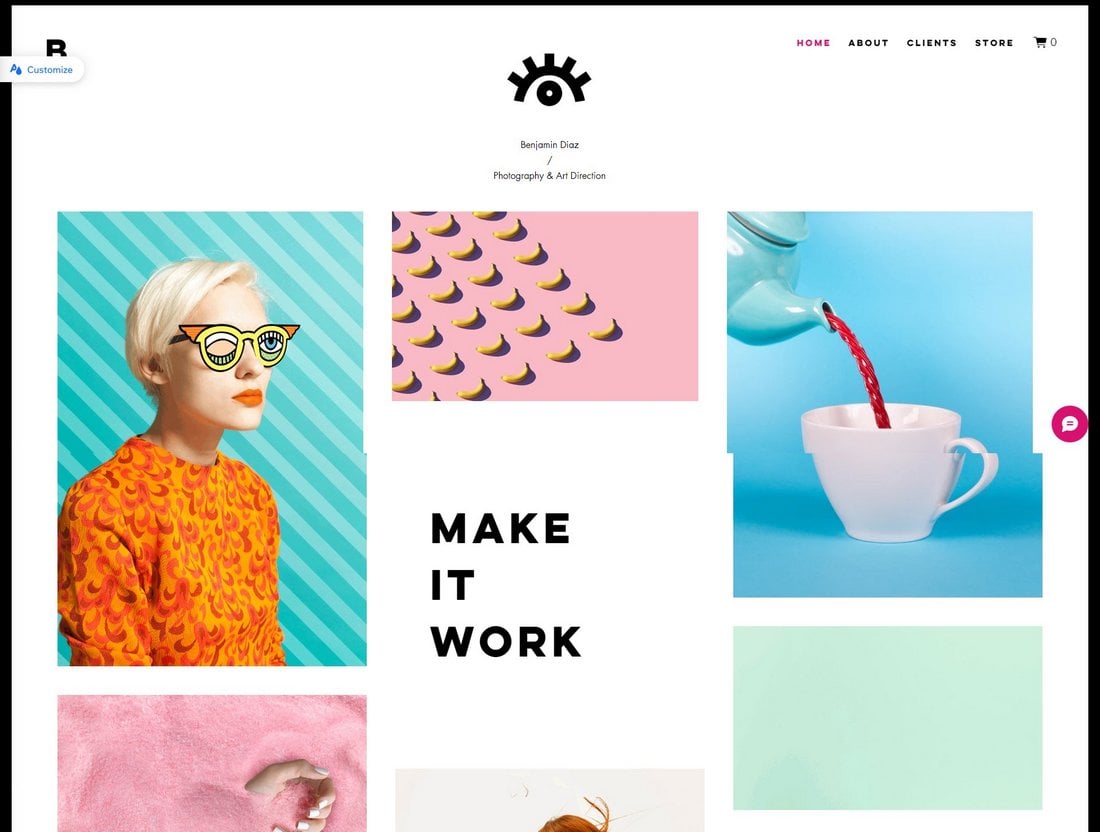
As a graphic designer, your biggest selling point when it comes to finding new clients is showing off your designs.
With this Wix portfolio template, you can create the perfect website to showcase your design work. It has a homepage with a large gallery to present your best designs. Each item on the gallery also gets its own case study page as well.

For illustrators and artists, the approach to making a portfolio website is different. You’ll need a minimal design that puts more focus on your artwork. That’s exactly what this Wix template does.
It has a basic portfolio website design with an image gallery on the homepage. There are also page layouts to create an about page and a contact page. You can also choose from other color schemes as well.

If you want to make a portfolio website with a modern and visual-centric design, this Wix template is perfect for you.
This template has a multipurpose design that you can easily customize to make portfolio websites for various types of professionals. It also has a stylish split-screen layout with space to include external links to your work.

Having a website where your potential clients can learn more about you is important, especially if you’re a speaker or coach.
With this Wix template, you can create a complete website to showcase all your work and experience in one place. It has space to promote your books, videos of speaking gigs you’ve done in the past, and more.

It doesn’t matter if you’re an author, freelance writer, or blogger, you should use your portfolio website to promote your work whenever you’re contacting clients.
It will only take a few clicks to make a professional-looking portfolio site when using this Wix writing portfolio template. It has a modern design with lots of space to showcase your books, blogs, and copywriting skills.

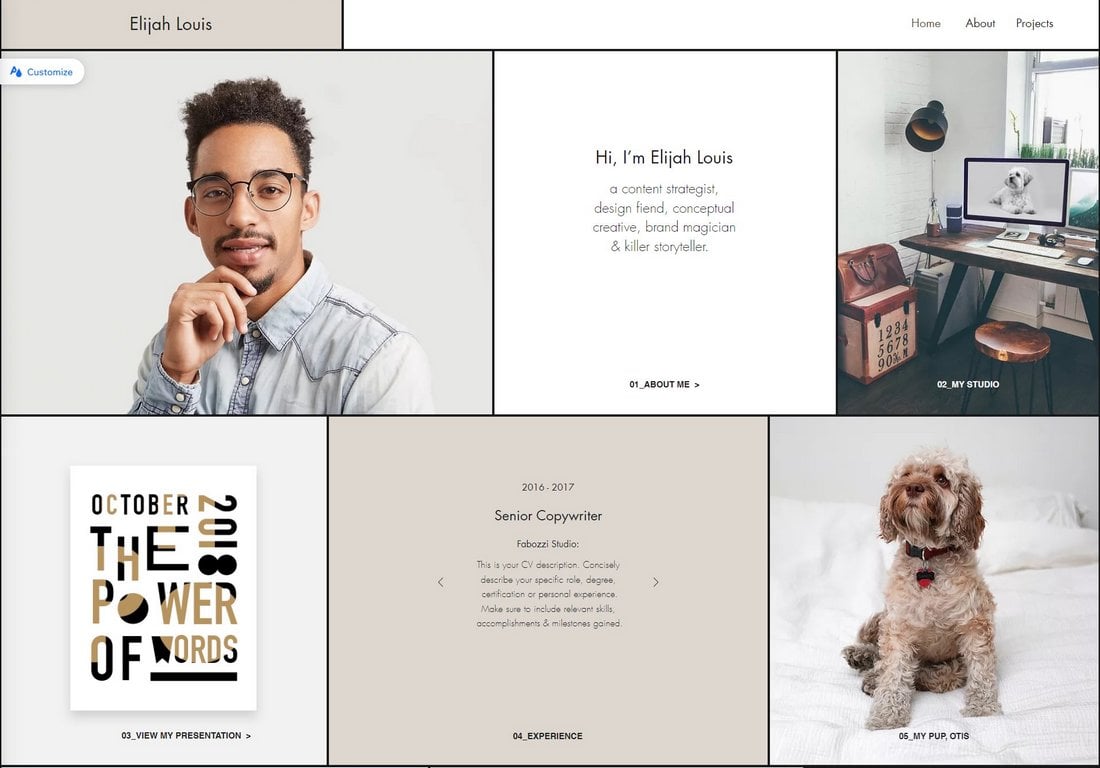
This is one of the coolest Wix portfolio templates on our list. It has a modern and stylish design with lots of unique elements to show off your skills and experience.
One of the best features of this template is its visual-centric design where you can show your experience using a timeline. It also has a section to include your skills and a gallery for your portfolio items.

If you’re a photographer, the best way to show off your skills is with lots of big photos and images. You can use this Wix portfolio template to do just that.
This template has a homepage with a gallery where you can show off lots of photos. It’s especially ideal for family and lifestyle photographers. Of course, other types of photographers can use it to make portfolio websites as well.
This portfolio template takes a more artistic approach to its design. This makes it a great choice for more creative photographers as well as designers.
The template has a big image gallery on the homepage with pages to mention your previous clients, case studies, and galleries for each project you’ve worked on.

Students and academics can use this Wix template to build stylish portfolio websites that promote their skills more effectively.
It features a beautiful and colorful design with lots of modern elements. As well as sections to share your story, skills, and experience.
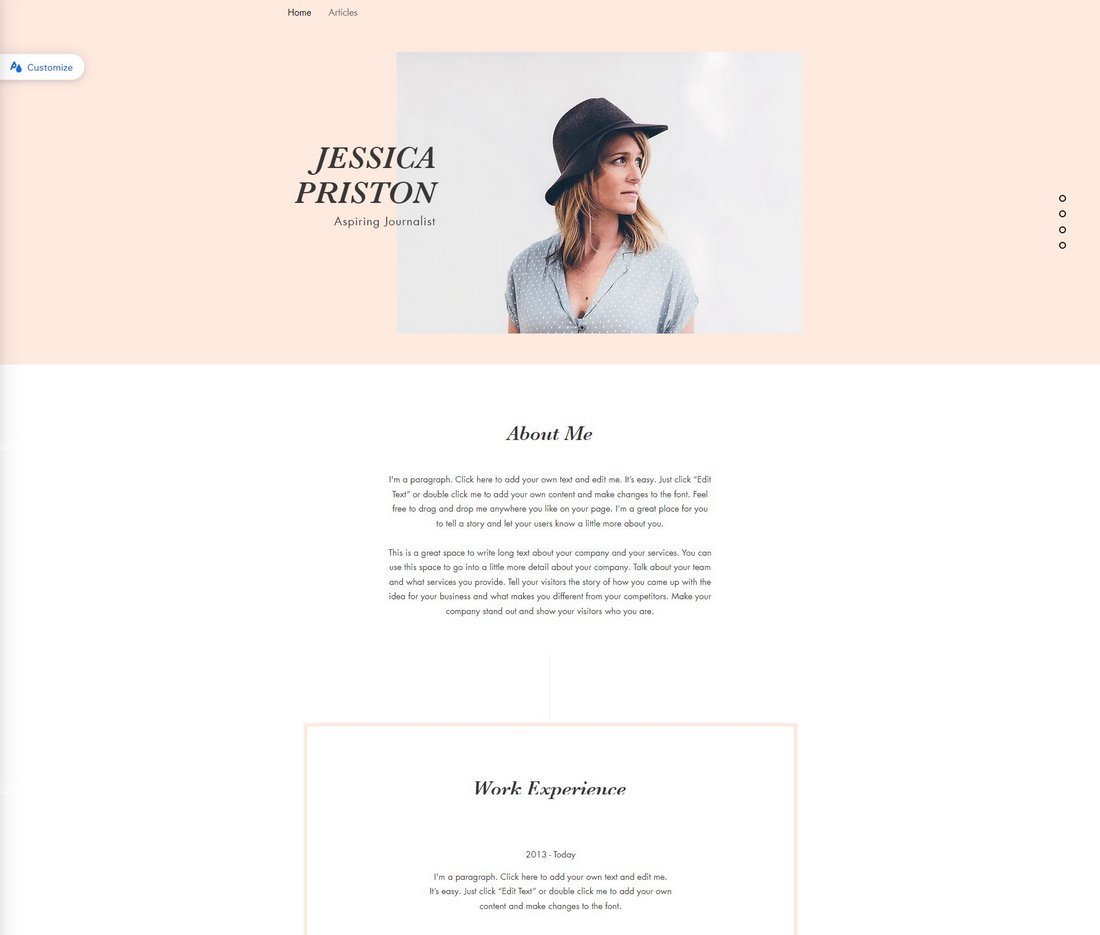
This Wix template is made with journalists in mind but you can use it to make portfolio websites for writers, bloggers, and other professionals as well.
The template uses a very clean and simple design with sections to describe your experience in written format. The template can be customized to add more sections too.

Are you a photographer trying to promote your services online? Then start by creating a bold portfolio website.
You can use this Wix template to create an elegant portfolio website with a different style of a homepage. This site lets you showcase big images on the homepage in a very elegant way. It’s ideal for photographers specializing in real estate, architecture, and interior design.
One of the best ways to be discoverable as a freelancer is to have a great website with detailed information about your services.
This Wix portfolio template will help you setup a great website to promote your freelance services. It has a modern and stylish design with plenty of sections to show off your skills.

If you want to create a classic resume-like website to make an online CV, this Wix template is the perfect choice for you.
It comes with a CV-style layout with sections to include detailed info about your education, experience, and skills. It’s most suitable for academics and students.

A colorful and stylish design is a must for making an attractive portfolio website for an art director. That’s why we recommend this Wix template.
It’s filled with different colors, stylish visual elements, and a large gallery to promote your work. It’s the perfect choice for art directors, artists, and designers.

If you’re a graphic designer wanting to create a simple portfolio website to show off your designs, then this Wix template is for you.
You won’t find any fancy animations or design elements on this site. It only has a simple layout with an image gallery to show your designs using images. And that’s simply perfect.
The highly visual approach, ability to embed videos, and large photo gallery makes this a great template for building portfolios for actors.
This template has a modern layout with lots of space to show off your headshot photos, showreel, and contact information.

Looking for the perfect template design to show your authority and industry experience as an architect? Then use this Wix template.
It comes with a simple and minimalist design that will allow you to show your authority and professionalism. Of course, it has space to showcase your work and projects too.

Whether you’re a fashion or lifestyle photographer, this Wix template will allow you to create a more effective portfolio website to show all your best photography in one place.
The template features a clean layout with a big image gallery on the homepage. You can also create albums and setup an online booking system within the website as well.

The dark and bold design of this template makes it a great choice for artists and illustrators. You can use it to showcase your work in a mysterious and elegant way.
How to Use Wix to Make a Portfolio Website
Making a portfolio website using Wix is easy. And there are two simple ways you can do it.
First, make sure that you signup for a Wix account. It has a free plan. Then browse our portfolio templates collection above to find a design you like. And click on the “Edit this Site” button to use the template to build your portfolio website.
From there, you can setup your website in just a few steps. The other method involves the same steps but in a different way.
Step 1: Go to Wix dashboard
Login to your Wix account and go to your account dashboard. Here you can manage all your Wix sites and create new ones.

Select Portfolio as the type of website you’re making and give your website a name.

On the next page, you can select to add more features to your website, like a blog, online store, or Instagram feed.

Step 2: Choose a Template
This next step is important. Here you get to choose a design for your portfolio website. Make sure to select the “Begin with a Template” option.

Now you can choose a template design for your site. Browse the library or search for a template to find the one you like.

Click on the “Use this Template” button to get started.
Step 3: Publish Your Site
Using the Wix site builder, you can fully customize the template design according to your needs. You can add more pages, change images, use a different color scheme, and more.

Once you’re ready, click the Publish button to go live with your website. That’s it!
You can make as many websites as you want on Wix for free and publish them on subdomain names. You can switch to a premium plan if you want to add a custom domain name to your website and remove ads.
via Pixel Lyft https://ift.tt/FnfY6mq
It is exciting how websites are being optimized. Localization, A/B testing, and cross-domain campaign tracking contribute to your bottom line. But why stop there? The customer experience is not determined by your website alone. Take the next step and start to include your telephony in the optimization span. And it is a relatively easy step to take as you are already familiar with the mechanisms. Simply follow these seven considerations.
First Things First: The Basics
Before determining which number type to use and when and how to present them on your website, it helps to know which number types are available, to begin with:
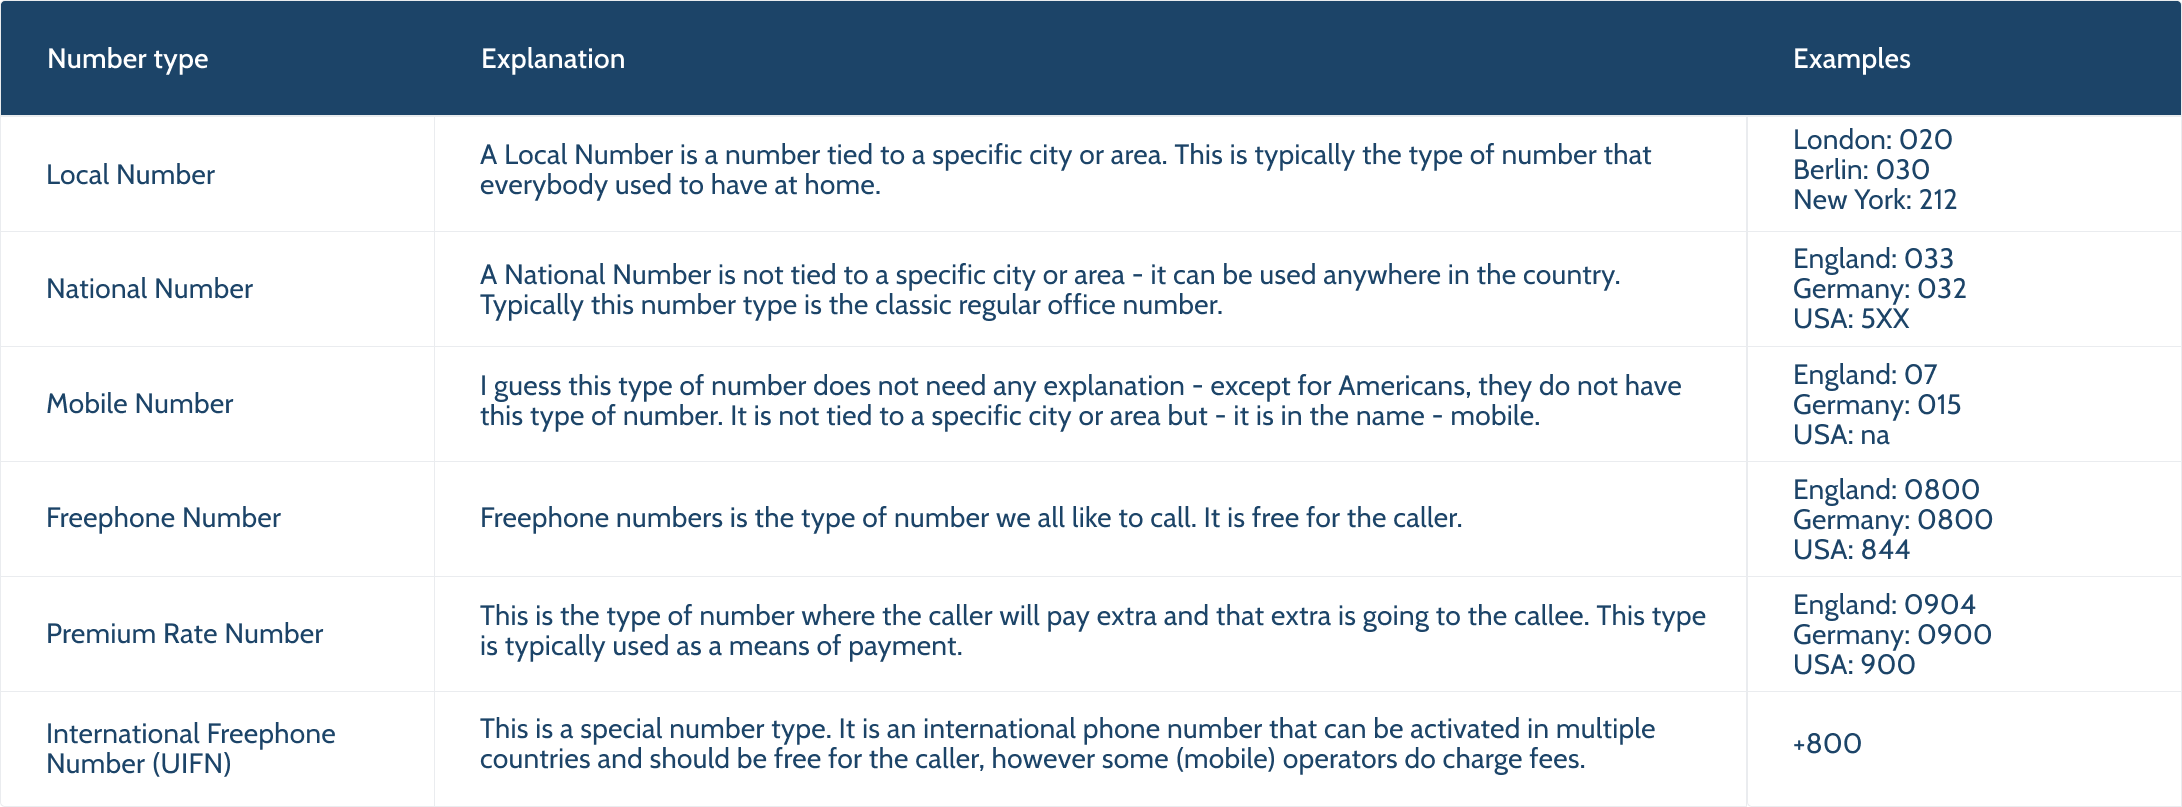
Each of these numbers can be valid to use, depending on your strategy. It is important to line up the localization, appearance (tone of voice), and other factors of your website and the phone number type you choose. And — like your website — keep testing and optimizing your choice.
Let’s dive into the details of the seven considerations to make.
Localization
A lot has been written about localization. Why it is important and how to achieve it with your website. All this attention is leading to great results. However, a website and the product are not the only points of contact with the customer and do not fully cover the customer experience domain. So, there is much to be gained here.
The localization of your website and phone number choice needs to be in sync. If your website is tailored per country, the phone number should also be country-specific. It would be weird to have a site for a specific country but not a phone number. And the beauty is that you have already determined the level of localization required for your website. You can simply match the localization needed to the available phone number types.
If your website localization is country-based, then get one of these numbers:
- National number,
- Freephone number,
- Premium Rate number.
All of these are suitable for country-wide operating businesses. We’ll get back to how to choose which one fits your case best later in this article.
If your website targets specific areas smaller than a country:
Get local numbers in the same areas you are targeting with your website. It strengthens your website localization strategy, and you continue to earn trust with the local phone numbers. If you have optimized (an instance of) your website specifically for London, it only makes sense to extend that strategy and present a Local London Phone number.
There are two number types that require additional attention:
- A mobile phone number is technically a number that is valid country-wide. However, it has its value for a very specific type of business: mostly local operating, independent service providers.
- An international freephone number (officially a UIFN number) is a single number that can be activated in multiple countries. If your website strategy is explicitly to express one voice for all, this number type fits that strategy; one single international phone number that can be activated in multiple countries. And it can have its advantages in other areas as well. We’ll dive into those a bit later in this article.
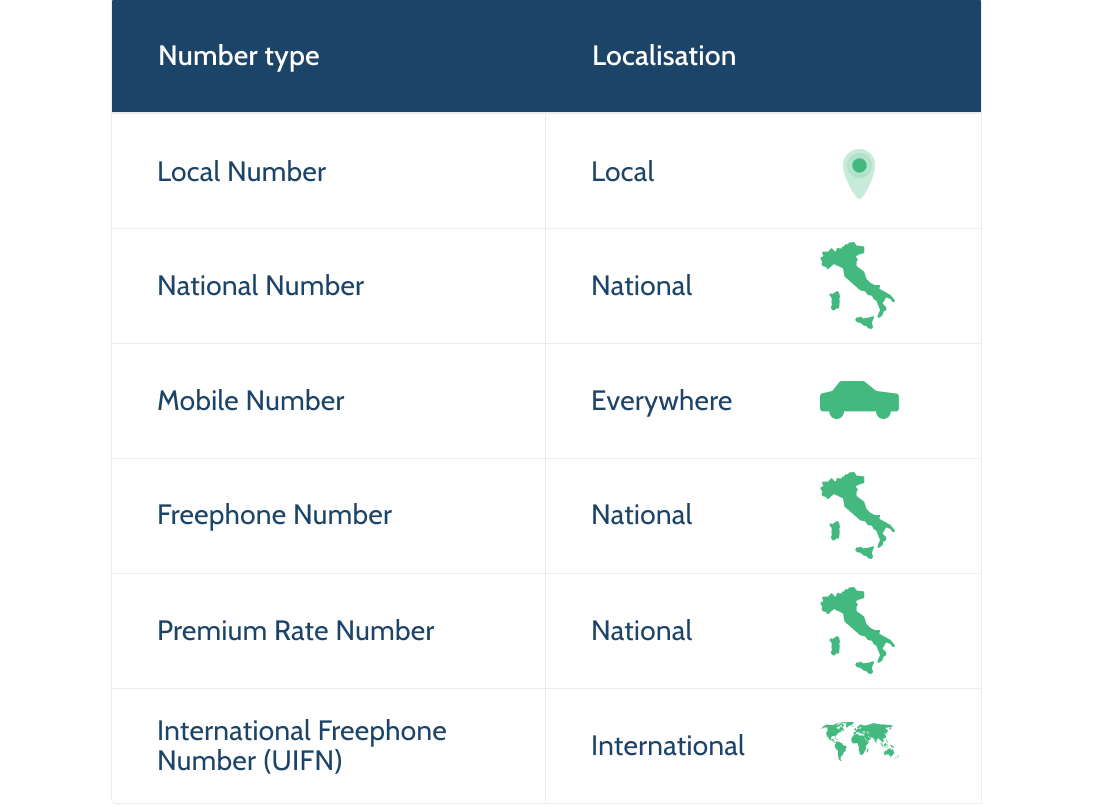
Appearance
Every type of number expresses an identity. This should match the identity your target market expects from you. Again, consistency is key. Make sure to align the tone of voice and the image you are projecting with your website with the appearance of the phone number(s) you choose.
If you are trying to generate a familiar feel on your website, a local number is your best option. You are calling someone close by, your neighbor. It gives the feeling you know them and that they are trustworthy.
If you want to provide a more corporate or formal impression, a national number is your choice. Bigger companies need a lot of phone numbers, and in many cases, they have offices in different cities. National Numbers have been created to overcome the issue of local numbers being snagged away from consumers. And as stated earlier, they can be used in multiple cities, which enables a company to be reachable in multiple cities via the same phone number. Not for nothing, National phone numbers are also called corporate numbers.
Only use a mobile number if you have to exhume mobility while it is ok that you are an independent service provider. Like an independent courier.
Freephone numbers are by far the most effective phone number types for sales lines and support lines for high-end services and products. If you want to welcome your callers with open arms, this is the number type to opt for, without a doubt.
If the phone call is the medium via which you provide your services, premium rate numbers can provide financial compensation for the services provided. In some cases, these numbers are also used as support lines with the goal of building a threshold for the customer to call and some compensation for the cost of the time spent. Note that this will negatively impact your customer experience. In most countries, it is not even allowed to offer a premium rate number for the support line on services under contract or products under warranty.
An international freephone number is counterproductive in localization but has other advantages. This number type has been defined by the ITU as an international alternative for the regular in-country freephone number and has the calling code +800. Having the same number available in multiple countries has its advantages: You only have to print one number on documentation to be used in multiple countries. And if you have international traveling callers, they only have to memorize one number.
Caller And Operational Cost
Each number type has its own caller and operational cost profile.
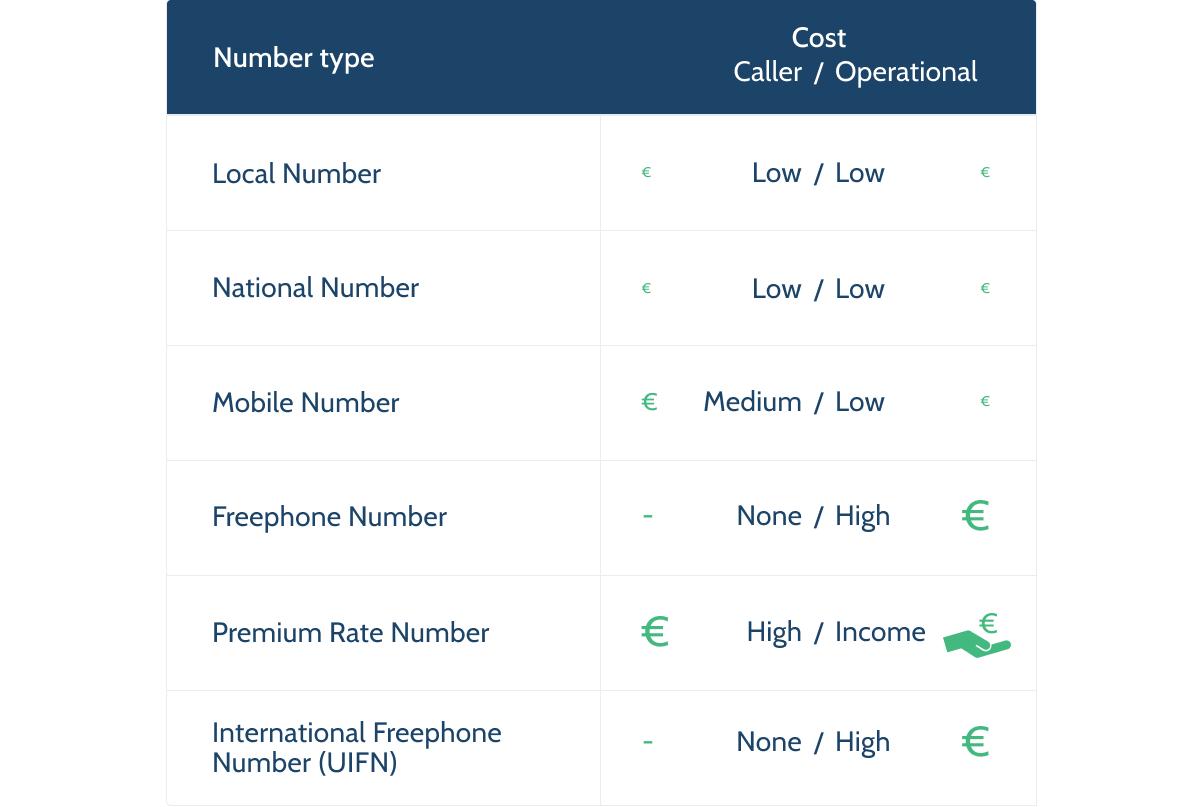
The most cost-effective numbers for both callers and you are local, national, and mobile numbers. These number types are mostly called from the caller bundle and have the lowest operational cost.
The purpose of a freephone number is to shift the caller cost from caller to operational. Therefore, the operational cost is relatively high.
A premium rate number is a payment method; therefore, caller cost is high and provides an operational source of income.
The cost model for an international freephone number is similar to the model of a normal freephone number. The cost is shifted to the operation.
Note: Since this is a globally defined phone number type, it is not regulated by the various in-country regulators to whom the caller operators have to answer.
Most fixed line operators do respect the 0-caller tariff. However, some mobile operators use this loophole to charge their customers for calls to these numbers.
Reachability
Not all number types can be called from everywhere. Obviously, you need to make sure your phone number is reachable by your target audience.
Local, national, mobile and international freephone numbers are usually internationally reachable.
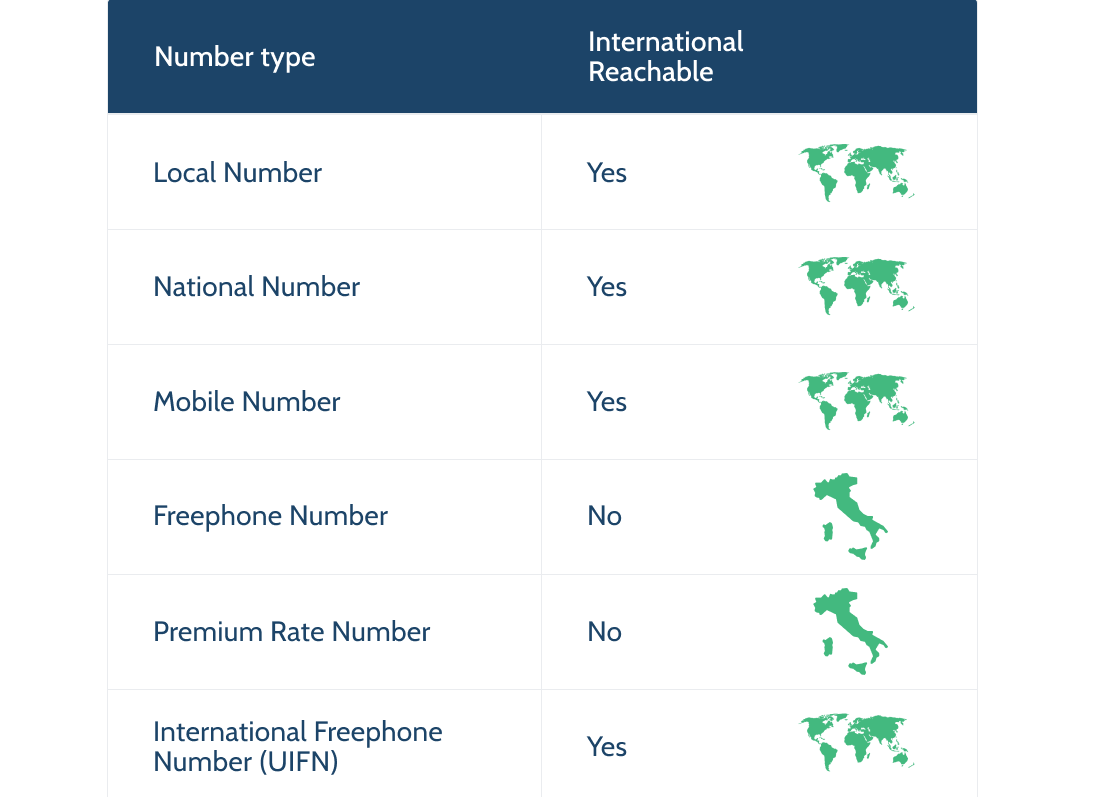
Normal freephone and premium rate numbers are not. As discussed before, these numbers do have their added value for many organizations. If you use these types of numbers, it is important to make sure you get a number in every target market or at least an alternative number for your local customer who just happened to travel outside of your country.
A/B And Campaign Testing
With these guidelines, you can make educated choices and proceed with confidence. But do you stop tweaking your website at this point? No, you don’t! This is where you start with optimization via methods like A/B Testing.
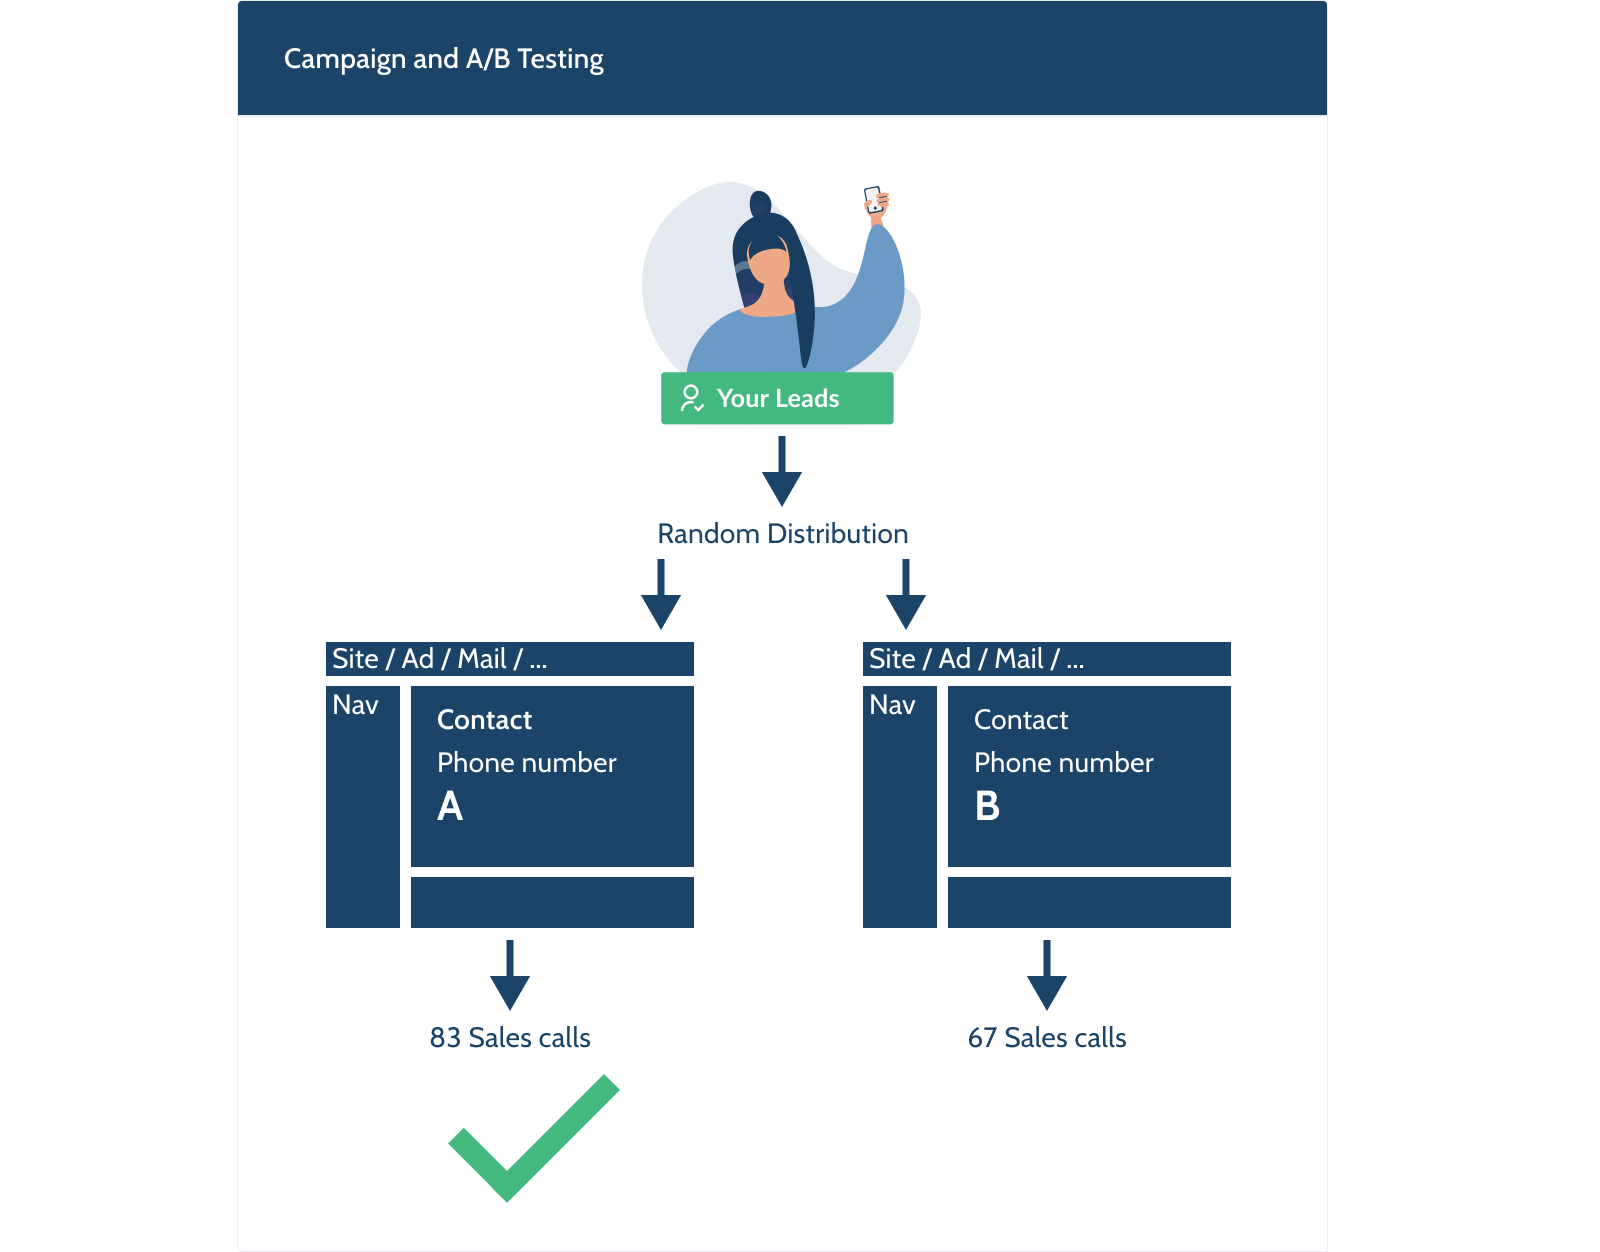
So why not include the phone number options in the scope of testing? All tools are available. All you have to do is include the phone numbers as an A/B parameter. And by adding the call statistics to the test evaluation, you can get to a more educated and accurate conclusion. Now, instead of the website, you are optimizing the website-phone number combination.
That also brings us to the next optimization. When evaluating an ad campaign or mailing, the evaluation usually stops with the clicks. But using different phone numbers (the same type of phone numbers to keep the evaluation clean) on both legs makes it very easy to add the call and call result statistics to the evaluation, enabling you to make even more educated decisions.
Conclusion
A/B testing can be used to evaluate and tweak your phone number choices. And by using different phone numbers (of the same type), you can make your Campaign evaluations more accurate.
Website And Phone Number Integration
Online communication and telephony are often regarded as two distinct domains, but they shouldn’t be. They are both customer contact points, and each can benefit greatly from the other.
Traditionally, just the phone number of the central office was presented. Once the realization set is that localization was also relevant for phone numbers, at least a block with multiple phone numbers was shown.
At the moment (hopefully even more after this article), the phone number shown is an integral part of the localization.

Best practice, however, is taking it a step further. Whatever you do, the goal should be to reach the goal as fast and efficiently as possible for your customer and you. This is valid for your website, your phone support, and both combined. The best results can be obtained when information gathered on the website is not wasted but put to the benefit of the following phone call. By simply presenting a phone number based on the information gathered, you skip the necessity of an (extensive) phone menu and have call screening in place. The image shows a chat setup, but obviously, the same result can be achieved with other setups as well.
And in many cases, that information can be used to present relevant self-service alternatives to the visitor. That could mean even higher efficiency for both your customers and you. Do note that it is essential to offer the options to the visitor — do not hide the possibility of calling. That will lead to frustration, negatively impact customer satisfaction, and cost you leads and customers.
Phone Number Presentation
The last consideration is the presentation of the phone number on your website. Obviously, the presentation depends highly on your website design, but here are a couple of pointers from the phone number perspective:
Link
Always link your phone numbers! Anything you do should contribute to making the life of your audience easier. Most devices are smart and connected, so link your phone number and enable your audience to place the call via a click.
Linking a phone number is easy with the ‘tel’ HTML tag, but what is important is always to use the international format. If you link the local format, visitors from another country will not be able to call the number. In the link, do not place spaces or dashes, just the phone number, for example, tel:+31201234567.
Flags
It does help to present the flag or ISO code of the country of the number presented. It confirms the localization to the caller. The caller recognizes the flag and feels confident to call the number. If it is someone from another country, at least they are aware they will call internationally. This way, you’ll prevent possible surprises for the caller afterward.

Furthermore, it gives you the opportunity to offer alternatives. If you have alternative phone numbers, it is possible to present the flag (combined with the number) in a dropdown. This way, in case the localization of the website is off, any visitor can find their relevant phone number. Note: When having alternatives, do not show all options, but show one (the one that should be relevant according to your site’s localization) and show there are alternatives. That way, you keep it simple.
Caller Tariffs
Important: When presenting a premium rate phone number, always present the caller’s cost as well.
Besides that, it is the right thing to do, and it is also obligatory in most countries. In most countries, it is even obligatory to present the cost with the same font type, size, and color as the phone number, to avoid any room misinterpretation.
On the other hand, when presenting a freephone number, it is good to make it explicit as well as you want to avoid any chance your visitor does not recognize the number is free to call. What is important in this case is to make sure to use the right language which is understood by your audience. Other names for a “freephone number” are, for instance, a “green number” or “toll-free number”; it has many different names in many other languages. Check with your target audience before naming your number.
The other number types usually fall within everybody’s calling bundle, and there is not really a reason to state the number type. The only thing important for your audience is the country of the phone number. Those numbers are internationally callable, which could impact the caller’s cost.
Takeaway
It could help to see phone numbers like URLs. They have — on an abstract level — the same dynamics and statistics.
| Visits | vs | Calls |
| Session duration | vs | Call duration |
| Conversion result | vs | Conversion result |
The customer journey is not limited to a website alone. Simply by combining the world of website design and telephony, far better results can be obtained for your organization. And thanks to the similarities and mutual benefits, it is an easy step to take.

(vf, yk, il)
via Pixel Lyft https://ift.tt/xrjuK0N
Although collaboration isn’t inherently part of design, we’d say it’s pretty dang close. After all, our entire model is based on collaboration—and we built this model because we know that in design, collaboration works.
That doesn’t mean it always works smoothly. Or easily. But over the years, we’ve learned a thing or two about collaboration in design—and so have our designers. Here are a few of the most valuable strategies we’ve learned over the years.
Why is collaboration important?
--
Collaboration enables you to create better designs.

As 99designs by Vista’s art director, Imogen Hoff, puts it, “It’s key for creative projects. Without it, ideas can become limited to your own experiences and thoughts, creating a bit of an echo chamber. Working with others enables different ways of thinking to combine and create something original, something that’s exciting.”
Essentially, the more eyes, brains and hands involved in a project, the more ideas are generated. That’s more eyes and perspectives to catch any oversights, mistakes or potentially insensitive design concepts before they leave the studio. This is also why diversity on creative teams is so important—when a team has varied backgrounds and experiences, their work reflects this diversity and by extension, it’s accessible to a wide range of audiences.

That’s not all. Collaboration also gives you access to resources you might not have in-house. For example, you might be tasked with animating a short video and determine that claymation, stop-motion animation created by making tiny movements to clay figures and scenes, frame-by-frame, is the best way to capture the vibe your client wants. Only problem is, your agency isn’t equipped to do claymation. You don’t want to turn down the project, and the client seems pretty committed to the claymation concept. So instead of giving up, you collaborate with an agency that can produce the claymation video the client wants.
Like they say, teamwork makes the dream work. And to help you collaborate better and by extension, do better creative work, we’ve broken down the most important factors to think about as you develop the optimal collaboration strategy for your company.
Identify your goals for collaboration
--
Next, identify Identify your goals for collaboration. Why are you collaborating, anyway? Is it because you need to or because you want to?

Maybe you’re collaborating because it’s the most effective way to reach certain markets. For example, it might be easier to work remotely with teams in other markets than to attempt to localize your branding. Or maybe your goal is to overcome a challenge you’re facing, like hitting deliverable deadlines.
Identifying your goals will help you determine the best software and schedule strategies for your company.
A few examples of goals you might have include:
1. Taking on more work
When you’ve got more work than you can handle, that’s a good problem to have!
But it’s still a problem you need to resolve. And when you have it, outsourcing work to freelancers is often the solution. To take on more work by hiring freelancers, an important part of your strategy is determining a budget for their wages. In many cases, the freelancers can just be integrated into whatever project management tools and workflows you’re currently using.
2. Expanding your offerings
Maybe you want to go beyond your brick-and-mortar shops and offer ecommerce. You might choose to collaborate with ecommerce branding and marketing professionals as well as web designers to make this happen.
3. Breaking into new markets
If you’ve determined it’s time to launch overseas, working with designers in your new markets can be a way to ensure your product is appropriate and relevant to those markets. Abroad and at home, you might also want to start reaching a new demographic. Collaborators can help with this too, especially when reaching that new demographic means offering something new—like an app to connect with Gen Z. You might not have needed to work with web developers before, but suddenly find yourself needing someone who can bring your brand to augmented reality. Keep doing what you’re good at, and hire expert developers to do the things they’re good at.
4. Shortening your turnaround times
This goes along with the first goal, taking on more work. Essentially, shortening your turnaround times enables you to take on more work. Freelancers are often the answer here, and depending on your budget and available resources, hiring more staff can be too. When shortening your turnaround times is just one goal and your others include expanding your offerings or taking on bigger projects, partnering with another agency can be the right call.
Next, brainstorm strategies for reaching the goals you’ve identified. If your goal is to take on more client work, the strategy might be to contract freelancers to take on the overflow or support your team. If it’s to expand your offerings, the strategy might be to research similarly sized organizations that offer the services you want to offer, then partnering with them and leveraging the relationship to benefit you both. In this latter scenario, your collaboration strategy might be to simply start using the tools they’re already using and becoming part of their ecosystem.
In other scenarios, it isn’t this easy—you’ll need to put your own systems in place, and depending on your needs and goals, you might have to budget for those systems.
What does your collaboration strategy need for success?
Every creative collaboration is unique. Before you can develop an effective collaboration strategy, you need to determine exactly which goals to reach in order to be successful.
Answer the following questions:
1. Where are the members of my team located?
Think about things like time zones and countries—the more time zones you have to consider, the harder it will be to schedule calls. Asynchronous communication—communication that doesn’t happen in real time—might be the better choice in this situation.
2. Who is on my team?
Does your team have a diverse skill set, or are you heading a team of people doing the same task, within the framework of a larger organization? If it’s the former, you might need to adjust your turnaround expectations because different tasks take different amounts of time.
From here, determine which tasks can be completed in-house and which need to be outsourced. If certain tasks need to be outsourced, determine if they’re at a large enough scale to require partnering with an agency or if it would be most cost- and time-effective to hire freelancers.
3. How many steps does each project go through from conception to launch?
This might be an average, rather than exact, number of steps. Beyond the number of steps each project typically involves, think about the length of time—do you tend to turn things around in a few weeks? A few months? If you tend to complete projects with multiple milestones, you might need a comprehensive project management system like Monday.com.
4. How involved is the client in the design process?
Determine if you need to include them in regular calls or if it’s sufficient to offer them “view only” looks at projects in progress. Involving the client can slow a project down, but in some cases, it’s necessary—not only for satisfying their curiosity but for ensuring the project is meeting their expectations.
5. Are my projects fairly similar to each other, or are they all unique?
This ties in with the first question. A wider range of projects can mean you need software with more functions, whereas working on very similar projects over and over often means you only need specific software functions. As you determine your budget, keep this in mind—more varied projects often means more varied programs, which generally means spending more money to ensure you’re properly equipped. .
6. When I collaborate, is it with the same people and teams every time?
Or do I tend to work with a revolving door of creatives? If you frequently contract new creatives for short-term and one-off projects, you need to budget time and money for onboarding all of them.
As you answer these questions, your team’s priorities will emerge. For example, your team might be spread across the globe and because of this, you might need to communicate asynchronously, rather than during regularly scheduled meetings. “Asynchronously” means a system where each person leaves notes at their own pace, rather than speaking in real-time. Think of a message board versus a chat room—that’s asynchronous vs. synchronous. Or your workflow might have the client giving input at every stage of development, so you might need to make weekly video calls part of your schedule, but not necessarily need to have multiple teams checking in with each other.
Once you’ve identified which tools you need to collaborate successfully—and it can be helpful to break them down into a list of must-haves and a list of would-be-nice-to-haves—think about the factors at play with your team. These are the things that can potentially make collaborating easier or more difficult, like team members’ different communication styles and your organization’s hierarchy (or lack thereof).
For example, if certain team members prefer to tackle projects on their own, then ask questions when they get stuck while others ask all their questions up front, then bang out their tasks without another word, it can be challenging to balance these communication styles. The solution might be a meeting at every project’s launch, then periodic check-ins with the individuals on the team.
Software is your friend
--
Organization is key to successful collaboration. Cloud-based software, software like Google Drive that doesn’t need to be downloaded but instead, “lives” on a server and may require a subscription to access, makes projects, notes and other content instantly accessible to anybody who has permission to access them—which makes these kinds of tools invaluable to any collaboration. In fact, remote working is almost impossible without them.
1. Project management tools
Project management software is where you track projects’ progress. At a glance, you can see the stage every project is currently in, and every collaborator can neatly see what’s on their plate and what’s due next. Keep in mind that this is a very basic description of what project management tools do—each one offers unique functionality, so when you’re looking for the ideal software, make sure you research which ones offer the functions you need and to test a few out before committing to one.
Some of the most popular project management tools include:
- Airtable. A spreadsheet-based collaboration platform that utilizes database capabilities.
- Asana. An organizational tool that makes it easy to note each project’s current stage and share files.
- Trello. An organization platform that uses a tile-based visual style for each project.
- Basecamp. A project management software that makes it easy to share files and communicate about these files.
2. Communication tools
Your team has gotta communicate. When you identified the best way for your team to collaborate with each other and those outside your organization, you probably identified what the team needs to communicate about, how frequently they need to communicate and who needs to be in each conversation.
For video meetings, these are a few of the most popular tools:
- Google Meet. A free video call platform that allows up to 250 participants per call.
- Zoom. A free-to-use video call platform that allows up to 1,000 participants per call.
- Microsoft Teams. A conferencing platform that allows video and audio calls.
- GoToMeeting. A web conferencing platform that allows video calls and desktop sharing.
For chat-style communication, try:
- Slack. A chat platform that allows one-on-one and group messaging.
- Discord. A chatroom-style platform that allows voice and text communication.
- Google Chat. A free instant messaging platform.
You can also post message board-style communication in Google Groups and in most of the project management tools used above. Think of these more like leaving notes, rather than instant messaging.
3. Collaborative design tools
And then there’s the whole reason you’re collaborating: design!
When you’re working with multiple creatives, it’s important that every person is able to see the latest version of each design. Tools like these make that possible:
- Figma. A collaborative tool that makes it easy to share design files with others.
- Bit.ai. A document collaboration tool used for creating wikis and sharing documents.
- Filestage. A review and approval platform that integrates with other creative tools to make revisions a breeze.
- Mockplus iDoc. An online collaboration tool that enables users to work on designs together.
4. Text tools
When you need to produce written content like blogs, social media posts and evergreen website content, Google Drive has you covered—for free!
In fact, Google Drive offers a lot of valuable collaboration tools. One of them is Google Jamboard, a tool similar to Microsoft Paint that allows multiple collaborators to hash out ideas visually.
Other tools that can be great for teams that work on blogs, ads, website content and other text documents include:
- Bit.ai
- ProofHub
- Confluence
- Dropbox and Dropbox Paper (for visual design work)
You’ll likely find your team using multiple programs to collaborate effectively. Projects might be completed using Google Drive, discussed in Slack and tracked in Asana. Remember, each piece of software is a tool, not a be-all, end-all solution to your collaboration needs.
Test, review, and try other options
--
Every time you introduce a new piece of collaboration software, ask your freelancers and remote or in-house colleagues for their feedback on it.
A lot of the tools listed above offer free trial periods, so testing them out doesn’t need to break the bank. Make sure you take full advantage of these testing periods and any support the companies provide—this kind of software is an investment in your company that will pay off in future profits and growth.
Apply this same outlook to strategies you implement, too, like weekly Zoom calls and your organizational hierarchy. You won’t always find a strategy that “clicks” on the first try… and you might not know what works best for your team—or what suits your project’s goals—best until you try a few different approaches.
Once you’ve got a system, be consistent…but willing to adapt
--
When people know what to do, they’ll have an easier time communicating with each other. Until and unless there’s a reason to change your systems (and there likely will be at some point!) stay consistent.
That means that if all questions get posted to the group Discord, a chat room-like program where conversations can be divided into separate channels so they stay focused, keep them in the Discord. If new designs are unveiled at the Monday meeting, save any new designs for the following Monday meeting. Routines answer questions and keep everybody organized, which is key to successful collaboration.
Collaborate on your next amazing design
--
Your designs are great. But collaborating with other creatives would make them even more amazing. Whether you’re brand new to collaborating with others or you’re an old pro, it’s important to stay up to date on the latest in collaboration software—and to regularly get feedback from your team and partners! Something that worked for you five years ago, back when you were a smaller team, might not work as well now…or it just might not be able to scale with you.
Ready to start collaborating?
Connect with the perfect designer for your next project.
via Pixel Lyft https://ift.tt/FL3x5d7
Getting a high-quality backlink can have an impact on your ability to rank higher in the SERP. But how do you know which sites provide the best backlinks? And how do you get that site to give you a link when you figure this out? With the right link-building tools, you’re able to answer these questions and more.
The link-building process is time-consuming. First, you need to have published content that’s indexed; then, people need to find out, understand its value, and link to it from their site. While there’s debate over how quickly this can happen, many SEO and content marketers think the process takes about 10 weeks before value from the link is seen.
The right link-building tools help you cut down on the time it takes to source those links.
Sure, backlinks will grow organically over time when you publish high-quality content, but if you’re just getting started or really need to boost your SEO fast, you’ll need to prime the pump. That’s what makes link-building outreach so effective. When you understand which sites can provide the most valuable backlinks to your content and have a process to reach out to them efficiently, you’re positioning your content to rank higher more quickly.
The type of backlinks you have are important — building links with low-authority or unrelated content will actually hurt your ranking ability over time. That’s why we’ve put together this list of 15 link-building tools you can use to level up your outreach campaigns.
Let’s dive in deeper to each one.
Each of these tools has specific functionality that facilitates a certain aspect of your overall link-building campaigns. We’ll break down how they provide value to the process and look at what you can do with the data you gain by using the tool.
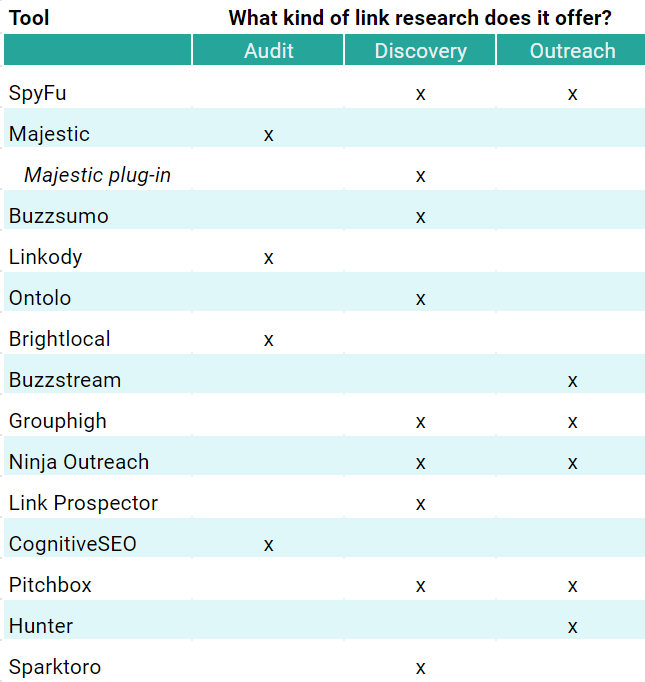
1. SpyFu
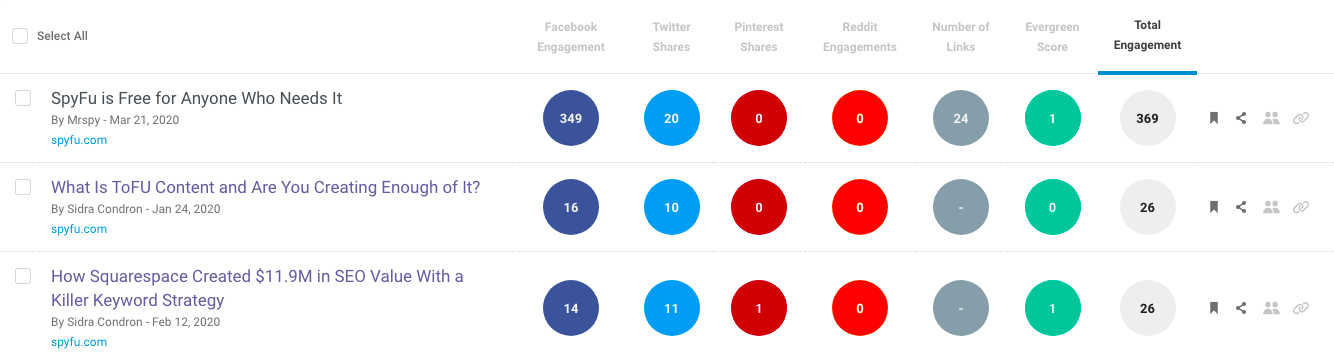
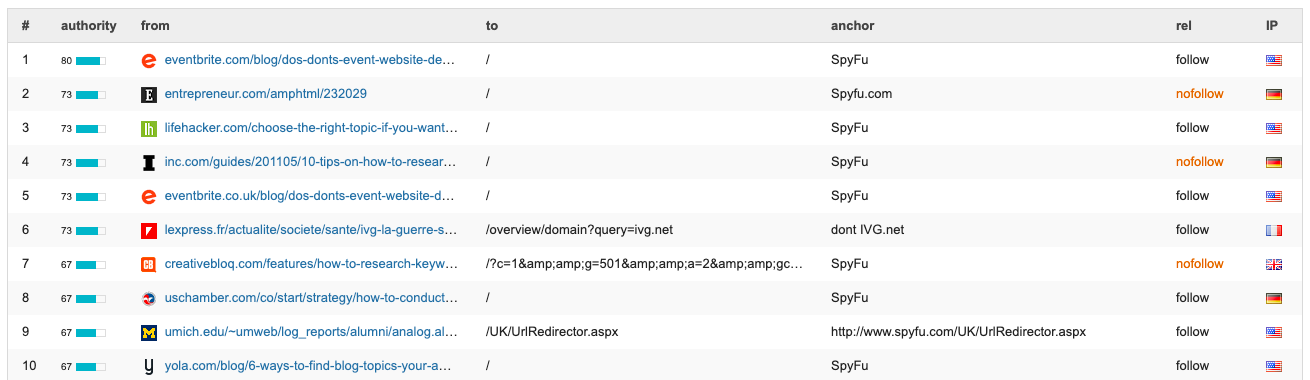
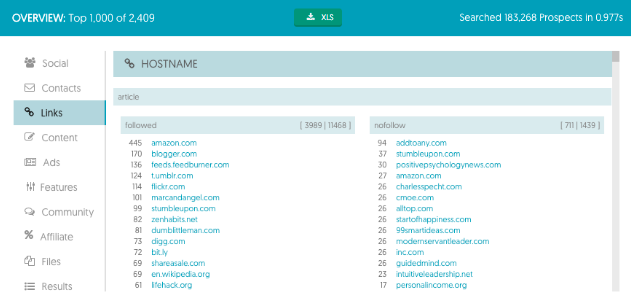
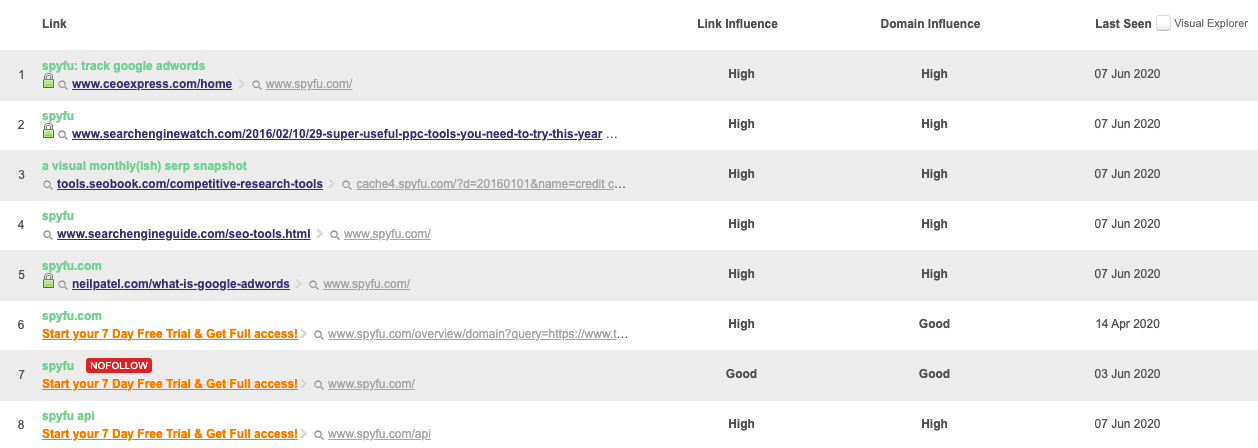
While we’re probably biased, SpyFu’s Backlink Builder is one of the most effective link-building tools you have at your disposal. Using our platform, you can easily identify the most high-value backlinks you can gain for any given keyword and filter by competitors. It finds links that are already indexed, and you can search by targeted keyword.

Our tool also helps you target specific types of websites and look at the types of links that help your competitors rank higher in the SERP. Whether it’s blogs, news sites, forums, or directories, you’ll always know how to tailor your content to appeal to a certain type of backlink.
Once you know which websites to target, the Backlinks Outreach feature gives you easy access to important social and contact information for the owners of those sites. That makes it easy to categorize and prioritize your outreach campaigns.
2. Majestic
The Majestic backlink tool helps you verify URL ownership and track backlink counts for your content in bulk. While certain features are available only to higher-tier accounts, Majestic’s Lite plan can help you get started with your backlink research.
The Link Context feature is great for gaining additional context on the structure of website content without having to navigate to it directly. Doing so significantly cuts down on the time it takes to target certain types of content. Think about it: when you know how a website typically structures its backlinks, it’s easier to create content that fits that model.
Majestic also has a Chrome plugin that checks websites as you browse them, which is a great way to see the types of links and how they provide value to specific pages on your or your competitors’ sites.
3. BuzzSumo
This link-monitoring tool helps you track how your website gains or loses backlinks as content matures. By compiling this information in a single location, you can easily track which types of content get the best backlinks, even if those websites don’t include your brand name in the anchor text.
Their analysis tool looks at the expertise, authority, and trustworthiness of every backlink you build to provide additional context on what links help or hurt your content. Combine this with how BuzzSumo tracks social sharing metrics and you’ll be able to gain a really great picture of the overall quality a potential backlink has to offer.
As a content-discovery tool as well, BuzzSumo helps you track how trends in your market affect engagement, which you can use to source the most relevant and up-to-date links.
4. Linkody
Linkody is a link-building campaign tracker. Their platform helps you stay on top of the different types of links you gain or lose over time. Use this tool to analyze your backlink profile and contest bad links, all from the same dashboard.
While their Backlink Checker doesn’t provide as much information on the overall SEO value of each link, they do tell you whether each link is a rel=follow or rel=nofollow. If you’re performing a backlink audit or want to prune potentially harmful links to your site, knowing which ones pass link equity to your site is invaluable.
Linkody also helps you see the specific URL these sites are linking to and the anchor text that’s used, so you can evaluate whether it’s the best introduction to your page. If it isn’t, come up with a suggestion before reaching out to the site own to request a more relevant snippet.
5. Ontolo
Ontolo is a link prospecting tool — meaning it helps you identify and reach out to potential backlink sources at scale. The platform provides functionality to build and import prospect lists, manage their content, and gain insight on the value certain links or individuals can provide to your content.
If you’re planning for an outreach campaign and don’t know where to start, Ontolo automates a lot of the manual work required to build your prospect list. Just make sure you vet each website to check that it matches up with the search intent of your keywords.
With their tool, you also gain access to a number of other prospecting tools to support your link-building campaigns.
6. BrightLocal
Focused on local SEO and marketing outreach, BrightLocal is a great tool for building links within your community. This is especially important if you are a brick-and-mortar business or are targeting a specific geographic market. Local outreach shows potential customers that you’re invested in their community.
Their citation builder is useful for managing the contact information of your business, making it easier for potential backlink providers or customers to find your content.
While this may not be as relevant for some distributed businesses, the data you gather using BrightLocal can inform personas and provide helpful context on why certain content ranks better in specific locations.
7. BuzzStream
A big part of the link-building process is connecting with influencers and brands that can amplify your content. BuzzStream is a platform for building links and digital PR that helps you track relevant stats on how these influencers share content on blogs and social media.

Their outreach tracker helps you see the progress of your campaigns and their automated site-research feature helps you learn as much as you can about potential prospects. That makes it easy to always be ready to put your best foot forward when reaching out.
Connecting with influencers in your market also helps you level up your content promotion because you’ll always have a group of engaged individuals to share your articles.
8. GroupHigh
Another contact-information platform, GroupHigh focuses on finding influencer and blogger contact information quickly and making it easy to prioritize your outreach. Their reporting is really useful for tracking the success and progress of your outreach campaigns.
Showcasing audience size for their influencers and blog database is a great feature for tailoring your link-building campaigns to specific verticals as well. You’ll be able to see what types of content resonate best for the various different points of contact you’re in touch with.
GroupHigh also does a great job of pulling in social information on your prospect list, making it easy to connect directly if you don’t want to rely on email correspondence alone.
9. NinjaOutreach
Similar to GroupHigh, NinjaOutreach helps you streamline your link-building outreach with automated email campaigns. You can create templates for each email and then track the results directly with a built-in customer relationship management (CRM) platform.

Their platform segments the market automatically as well, so it’s easy to create targeted campaigns for specific types of high-value backlinks. When you’re reaching out to hundreds of individual prospects, this kind of automation is a huge time-saver.
When you combine this segmentation with their platform-specific searches for Instagram and YouTube, it’s easy to find the most potentially valuable influencers for any criteria.
10. Link Prospector
Built by Citation Labs, this backlink search engine provides up-to-date information on specific subsections of the market based on your target keyword. You’ll be able to source link opportunities based on sixteen distinct criteria, including PR, audience-building, and content development.

Being able to target your search to specific types of backlinks helps you flesh out your backlink profile with the best possible links. When you add custom search parameters, it’s possible to narrow your search to exactly the kinds of backlinks you need for any piece of content.
Link Prospector is one of the first tools with a segment for sourcing comments and expert interviews as well, which can be very helpful if you want to tap into social proof for a particular piece of content.
11. cognitiveSEO
The cognitiveSEO platform provides a number of SEO-focused tools for markers and agencies. Their backlink-analysis tool helps you identify potential hazardous links in your content as well as review recent changes to the backlink profile of your website.
Check out their backlink auditor to create reports that showcase the current state of your backlink profile and link-building campaigns. With email notifications for new/lost backlinks included, you’re always able to stay on top of important updates to your backlink profile.
Using this link-building tool, you can also identify rel=nofollow links and send automated disavow requests. It’s a great way to cut down on negative links in your backlink profile.
12. Pitchbox
Pitchbox is a platform for content promotion, link-building, and influencer outreach. Their tools help you create personalized outreach campaigns with automated emails that can be triggered by specific rules you create in their tool.
Pitchbox’s pipeline analytics help you track the status of your outreach campaigns and optimize how you create them. Think about it like you’re creating an autoresponder that nurtures prospects and helps them see value in providing backlinks to support your content.
With this tool, you gain access to a more robust email marketing platform than some of the others we’ve featured so far. So, if you’re low on time or resources, you can use Pitchbox to run a more efficient campaign.
13. Hunter.io
Hunter is a platform for sourcing contact information. Use it to flesh out your prospect lists with the most up-to-date email addresses for anyone in the company you’re trying to contact. When you’re reaching out to request a link, it’s important to know exactly who you should be talking to.
Their simple platform is free for up to 50 requests, making this one of the more affordable tools we’re featuring here. While it’s somewhat less robust than others, it does the job of sourcing contact information better than most.
Check out your own contact information on their tool, as well, so you always know that people who want to contact your team for backlinks have the opportunity to do so.
ContactOut
An alternate to Hunter.io is ContactOut. This tool promises at-your-fingertips personal contact information like email addresses and phone numbers. It offers both paid and free plans, and we like that the free plan does not have a time limit. As long as you have just a few searches that you’d do each month, this could be the right fit for occasional use over a long term.
14. SparkToro
SparkToro is technically an audience-intelligence platform, but when you’re going through the link-building process, it is really helpful to track who’s already sharing similar content. This ensures that you’re not wasting time by asking for a link from someone who’s sharing your content organically.
SparkToro also helps you see what websites people tend to visit for specific keywords. If you’re looking for backlinks for any given term, this helps you understand at a glance what the current content marketing looks like in the industry.
Try using these audience insights to build on the relationship your content has already created and boost engagement within your community.
15. Google Sheets
This might be a no-brainer, but a solid spreadsheet platform is absolutely necessary for every link-building campaign. Whether you’re bringing together metrics from disparate tools or tracking your manual outreach directly, it’s vital to have a single source of truth in a tool that you own.
Use Sheets to create conditional formatting and specific rules to make it easy to understand your data quickly. While Sheets is an incredibly valuable tool for sharing and storing data, it can be difficult to demonstrate how valuable that data is without proper visuals.
If you’re not comfortable creating these on your own, websites like Sheets for Marketers have lots of templates to help you get started.
When you’re reaching out to influencers, bloggers, or your professional network to request a backlink, any help you can get is incredibly valuable. Otherwise, you’ll spend your time manually emailing prospects or following up on recent backlinks to make sure the anchor text is correct instead of sourcing new opportunities for your content.
Using a link-building tool cuts down on this work considerably, giving back time that you can use to create better content for your readers.
via Pixel Lyft https://ift.tt/Nocd60l
When it comes to performance, you shouldn’t be stingy. There are millions of sites, and you are in close competition with every one of those Google search query results. Research shows that users will abandon sites that take longer than three seconds to load. Three seconds is a very short amount of time. While many sites nowadays load in less than one second, there is no one size fits all solution, and the first request can either be the do or die of your application.
Modern frontend applications are getting bigger and bigger. It is no wonder that the industry is getting more concerned with optimizations. Frameworks create unreasonable build sizes for applications that can either make or break your application. Every unnecessary bit of JavaScript code you bundle and serve will be more code the client has to load and process. The rule of thumb is the less, the better.
Data loading patterns are an essential part of your application as they will determine which parts of your application are directly usable by visitors. Don’t be the site that slows their entire site because they chose to load a 5MB image on the application’s homepage and understand the issue better. You need to know about the resource loading waterfall.
Loading Spinner Hell And The Resource Loading Waterfall
The resource loading waterfall is a cascade of files downloaded from the network server to the client to load your website from start to finish. It essentially describes the lifetime of each file you download to load your page from the network.
You can see this by opening your browser and looking in the Networking tab.

What do you see there? There are two essential components that you should see:
- The chart shows the timeline for each file requested and loaded. You can see which files go first and follow each consecutive request until a particular file takes a long time to load. You can inspect it and see whether or not you can optimize it.
- At the bottom of the page, you can check how many kB of resources your client consumes. It is important to note how much data the client needs to download. On your first try, you can use it as a benchmark for optimizations later.
No one likes a white blank screen, especially your users. Lagging resource loading waterfalls need a basic placeholder before you can start building the layout on the client side. Usually, you would use either a spinner or a skeleton loader. As the data loads one by one, the page will show a loader until all the components are ready.
While adding loaders as placeholders is an improvement, having it on too long can cause a “spinner hell.” Essentially, your app is stuck on loading, and while it is better than a blank HTML page, it could get annoying, and visitors would choose to exit your site.
But isn’t waiting for the data the point?
Well, yes, but you can load it faster.

Assuming you want to load a social media layout, you might add a loading spinner or a skeleton loader to ensure that you don’t load an incomplete site. The skeleton loader will usually wait for:
- The data from the backend API;
- The build layout according to the data.
You make an asynchronous call to an API, after which you get the URL for the asset on the CDN. Only then can you start building the layout on the client side. That’s a lot of work to show your face, name, status, and Instagram posts on the first try.
The Five Data-Loading Patterns You Need to Know
Developing software is becoming easier as frameworks like React, Vue, or Angular become the go-to solution for creating even the simplest applications. But using these bulky frameworks filled with a ton of magical functions you don’t even use isn’t what you should be going for.
You’re here to optimize. Remember, the less, the better.
But what if you can’t do less? How will you serve blazingly fast code, then? Well, it’s good that you’re about to learn five data-loading patterns that you can use to get your site to load quickly or, as you would say, blazingly fast.
Client Side Rendering, Server Side Rendering And Jamstack
Modern JavaScript frameworks often use client-side rendering (CSR) to render webpages. The browser receives a JavaScript bundle and static HTML in a payload, then it will render the DOM and add the listeners and events triggers for reactiveness. When a CSR app is rendered inside the DOM, the page will be blocked until all components are rendered successfully. Rendering makes the app reactive. To run it, you have to make another API call to the server and retrieve any data you want to load.
Server-side rendering (SSR) is when an application serves plain HTML to the client. SSR can be divided into two types: SSR with hydration and SSR without hydration. SSR is an old technique used by older frameworks such as WordPress, Ruby on Rails, and ASP.NET. The main goal of SSR is to give the user a static HTML with the prerequisite data. Unlike CSR, SSR doesn’t need to make another API call to the backend because the server generates an HTML template and loads any data within it.
Newer solutions like Next.js uses hydration, where the static HTML will be hydrated on the client side using JavaScript. Think of it like instant coffee, the coffee powder is the HTML, and the water is the JavaScript. What happens when you mix instant coffee powder with water? You get — wait for it — coffee.
But what is a Jamstack? Jamstack is similar to SSR because the client retrieves plain HTML. But during SSR, the client retrieves the HTML from the server. However, Jamstack apps serve pre-generated HTML directly from the CDN. Because of this, Jamstack apps usually load faster, but it’s harder for developers to make dynamic content. Jamstack apps are good with pre-generating HTML for the client, but when you use heavy amounts of JavaScript on the client side, it becomes increasingly harder to justify using Jamstack compared to Client Side Rendering (CSR).
Both SSR and Jamstack have their own differences. What they do have in common is they don’t burden the client with rendering the entire page from scratch using JavaScript.

When you optimize your site’s SEO, using SSR and Jamstack are recommended because, compared to CSR, both return HTML files that search bots can easily traverse. But search bots can still traverse and compile JavaScript files for CSR. However, rendering every JavaScript file in a CSR app can be time-consuming and make your site’s SEO less effective.
SSR and Jamstack are very popular, and more projects are moving to SSR frameworks like Next.js and Nuxt.js compared to their vanilla CSR counterparts, React and Vue, mainly because SSR frameworks provide better flexibility when it comes to SEO. Next.js has a whole section talking about SEO optimizations on their framework.
An SSR application will generally have templating engines that inject the variables into an HTML when given to the client. For example, in Next.js, you can load a student list writing:
export default function Home({ studentList }) {
  return (
    <Layout home>
        <ul>
          {studentList.map(({ id, name, age }) => (
            <li key={id}>
              {name}
              <br />
              {age}
            </li>
          ))}
        </ul>
    </Layout>
  );
}
Jamstack is popular with documentation sites that usually compile code to HTML files and host them on the CDN. Jamstack files usually use Markdown before being compiled to HTML, for example:
---
author: Agustinus Theodorus
title: ‘Title’
description: Description
---
Hello World
Active Memory Caching
When you want to get data that you already had quickly, you need to do caching — caching stores data that a user recently retrieved. You can implement caching in two ways: using a super-fast key-value store like Redis to save data keys and values for you and using a simple browser cache to store your data locally.
Caching partially stores your data and is not used as permanent storage. Using the cache as permanent storage is an anti-pattern. Caching is highly recommended for production applications; new applications will start using caches as they gradually mature.
But when should you choose between a Redis cache (server cache) and a browser cache (local cache)? Both can be used simultaneously but will ultimately serve a different purpose.
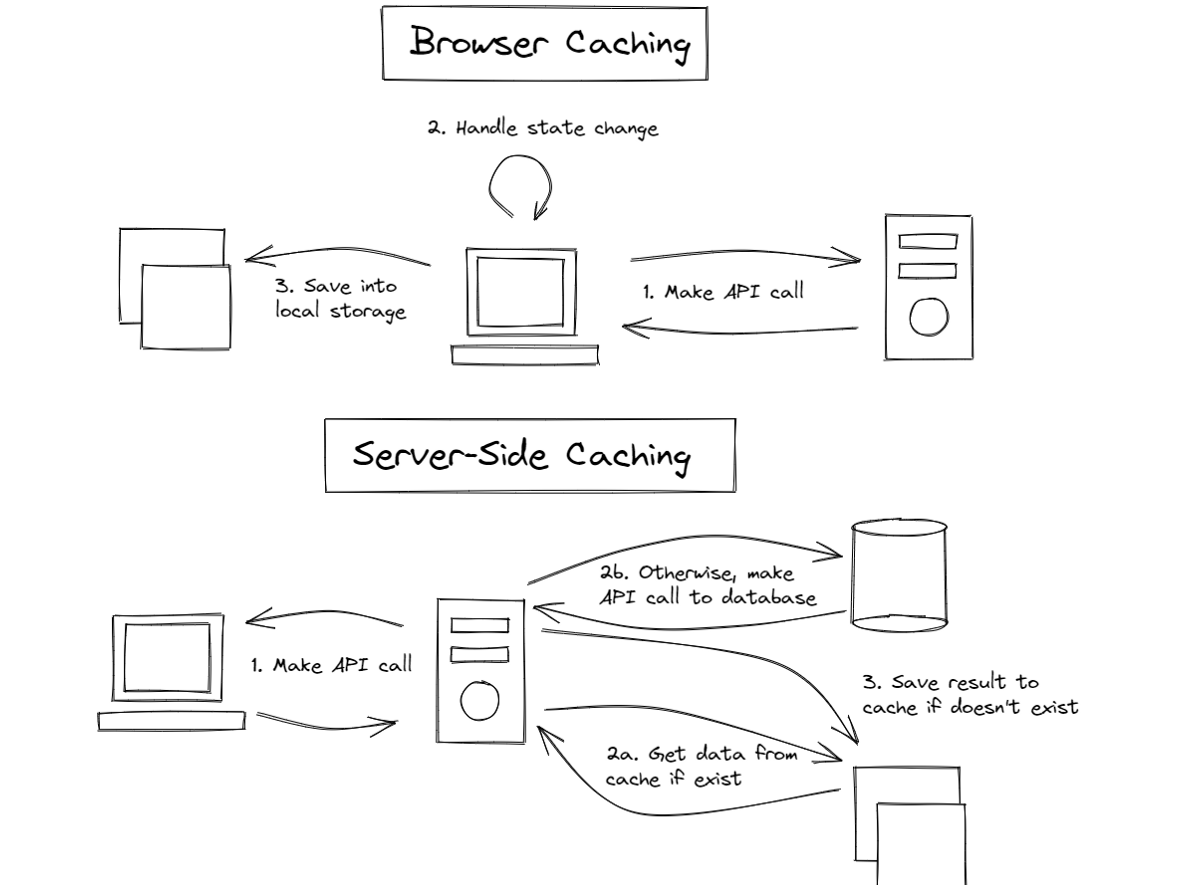
Server caches help lower the latency between a Frontend and Backend; since key-value databases are faster than traditional relational SQL databases, it will significantly increase an API’s response time. However, a local cache helps improve app state management, enabling the app to persist state after a page refresh, and helps future visits.
In summary, if you want to increase the performance of your application, you can use server caches to speed up your APIs, but if you want to persist your app state, you should use the local storage cache. While local caches might not seem helpful at all, it does help reduce the number of API calls to the backend by persisting state that doesn’t frequently change. However, local caches will be better when combined with live data.
Data Event Sourcing
You can make a real-time live connection between the Front-end and Backend via WebSockets. WebSockets are a two-way communication mechanism that relies on events.

In a common WebSocket architecture, the Front-end application will connect to a WebSocket API, an event bus, or a database. Most WebSocket architectures utilize it as a substitute to REST, especially in use cases like chat applications; polling your Backend service every few seconds becomes a very inefficient solution. WebSockets allow you to receive updates from the other end without needing to create a new request via the two-way connection.
WebSockets make a tiny, keep-alive connection compared to normal HTTP requests. Combining WebSockets with local browser cache creates a real-time application. You can update the app’s state based on the events received from the WebSocket. However, some caveats regarding performance, scalability, and potential data conflicts exist.

A pure WebSocket implementation still has a lot of faults. Using WebSockets instead of regular HTTP calls changes how your entire application behaves. Just a slight connection issue can affect your overall UX. For example, a WebSocket cannot have real-time performance when it needs to query the database every time there is a get request. There are bottlenecks in the backend that needs to be optimized for better real-time results to make WebSockets feasible and a more reasonable answer.
There needs to be an underlying architectural pattern that can support it. Event sourcing is a popular data pattern you can use to create reliable real-time applications. While it doesn’t guarantee overall app performance, it will give your customers better UX by having a real-time UI.
Modern JavaScript has WebSocket providers that you can use. The WebSocket class opens a connection to a remote server and enables you to listen when the WebSocket opens a connection, closes a connection, returns an error, or returns an event:
const ws = new WebSocket('ws://localhost');
ws.addEventListener('message', (event) => {
    console.log('Message from server ', event.data);
});
Do you want to react to server events? Add an addEventListener function and insert a callback that it will use:
ws.send('Hello World');
Want to send a message? WebSockets got you. Use the send function to get a message out to the server. It’s as easy as printing “Hello World.” The examples are from the MDN Docs.
Prefetching And Lazy Loading
Prefetching and lazy loading has become common knowledge among frontend developers. Efficient use of a client’s resources and bandwidth can greatly improve your application’s performance.
Prefetching
Prefetching gives developers more granular control over the client’s idle bandwidth, loading resources, and pages that the client might need next. When a website has a prefetch link, the browser will silently download the content and store it within its cache. Prefetched links can have significantly faster loading times when the user clicks them.
<link rel="prefetch" href="https://example.com/example.html">
You specify prefetch URLs within the link HTML element, more specifically, the rel attribute. Prefetching has a few pros and cons:
- Pros: Prefetching waits until the browser’s network is idle and is no longer in use and will stop when you trigger usage by clicking a link or triggering a lazy loading function.
- Pros: Prefetching caches data within the browser, making page transitions faster when redirecting to a link.
- Cons: It can be used to download trackers, compromising user privacy.
Lazy Loading
Lazy loading is a common data-loading pattern that makes the client load à la carte results, not loading everything until the client needs it. Lazy loading will make the client fetch the latter parts of a website after they’ve scrolled into view.

Lazy loading makes your site load faster by allowing the browser to concentrate on more important, on-screen resources. You won’t need to load all the images/text on a given site when you can’t see it. But lazy loading can only help you delay downloading resources and doesn’t make your resources smaller and more cost-efficient.
However, if you are looking to make a more cost-efficient solution that is similar to lazy loading, try looking for Resumability.
Resumability
Many developers have never heard of the Resumability concept before. Resumability renders JavaScript partially in the server, the final state of the render will be serialized and sent to the client with the corresponding HTML payload. Then the client will finish the rendering, saving time and resources on the client side. Essentially, Resumability uses the server to do the heavy lifting and then gives the client a minimal amount of JavaScript to execute via serialization.
The main idea of Resumability is to serialize the application state from the server to the client. Instead of loading everything (HTML, JS) and hydrating them on the Front-end, Resumability serializes the JavaScript parsing in stages and sends them to the client in HTML.
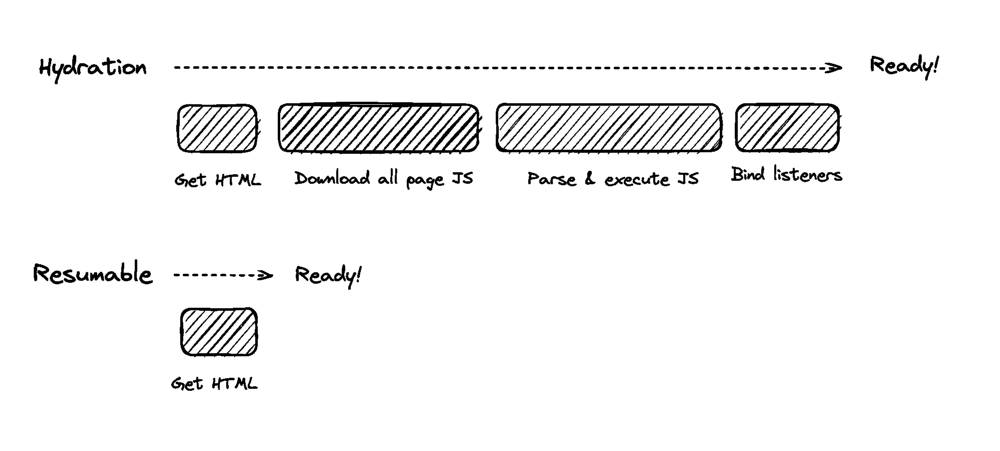
Page startups will be instantaneous because the client doesn’t have to reload anything and can deserialize the state injected into the HTML. Resumability is a very foreign concept and is not common in many projects. It was coined by the founder of Qwik, Misko Hevery.
Qwik is a JavaScript framework that relies on Resumability under the hood. Unlike other frameworks, Qwik is built from the ground up with Resumability in mind. Frameworks like React and Vue can never utilize Resumability without sacrificing backward compatibility. It is because the lazy loading component of Qwik uses asynchronous lazy loading compared to the synchronous nature of most JavaScript frameworks.
The goal of Qwik is to load as minimal JavaScript as possible. Lazy loading JavaScript is hard and, in some instances, impossible. The less you need it, the better. Resumability allows developers to have fine-grained lazy loading and decreased memory usage for mobile applications optimizing your site for the mobile web.
Using Qwik is similar in some ways to React, specifically, its syntax. Here is a code snippet example of how Qwik works in code. The root of the application will be in the form of HTML:
import { App } from './app';
export const Root = () => {
  return (
    <html>
      <head>
        <title>Hello Qwik</title>
      </head>
      <body>
        <App />
      </body>
    </html>
  );
};
The root has a dependency on App. It will be the lazy loaded Qwik component:
import { component$ } from '@builder.io/qwik';
export const App = component$(() => {
  return <p>Hello Qwik</p>;
});
Qwik and React have similarities at the component level. But it differentiates when you get into the server side of things.
import { renderToString, RenderOptions } from '@builder.io/qwik/server';
import { Root } from './root';
export default function (opts: RenderOptions) {
  return renderToString(<Root />, opts);
}
The code snippet above shows you how the server-side of Qwik serializes the root component using the renderToString method. The client will then only need to parse pure HTML and deserialize the JavaScript state without needing to reload them.
Summary
Application performance is essential for the client. The more resources you have to load on startup, the more time your app will need to bootstrap. Loading times expectations are getting lower and lower. The less time you need to load a site, the better.
But if you are working on large enterprise applications, how you can optimize your apps are not obvious. Data-loading patterns are one way you can optimize your applications’ speed. In this article, you reviewed five data-loading patterns that may be of use:
- Server Side Rendering (SSR) and Jamstack;
- Active Memory Caching;
- Data Event Sourcing;
- Prefetching and Lazy Loading;
- Resumability.
All five of which are useful in their own circumstances.
SSR and Jamstack are generally good choices for applications that require less client-side state management. With the advent of modern JavaScript frameworks like React, more people have tried Client Side Rendering (CSR), and it seems that the community has come full circle back to SSR. SSR is the technique used by old MVC web frameworks to use template engines to generate HTML based on the data on the backend. Jamstack is an even older depiction of the original web, where everything was using just HTML.
Active memory caching helps users load data from APIs faster. Active memory caching solves the important issues around data loading by either caching the results on a remote cache server (Redis) or your local browser cache. Another data-loading pattern even uses it, prefetching.
Next, event sourcing is an architectural pattern that supplements the real-time event-based WebSocket APIs. Plain old WebSockets are not enough to become completely efficient because even though the WebSocket itself is real-time, the recurring API call to the database can cause a bottleneck. Event sourcing removes this problem by creating a separate database for retrieving data.
Prefetching and lazy loading are the easiest solutions to implement. The goal of prefetching is to load data silently during network idle times. Clients will save the prefetched link inside their browser caches, making it instantaneous on contact.
Lazy loading reduces the number of resources you need to load on the first click. You only need the resources that you see directly after the page loads. However, Resumability takes lazy loading to the extreme. Resumability is a method of lazy loading JavaScript components by rendering them in the server and then serializing the state to continue the render on the client via HTML.
Where To Go From Here?
Learning to optimize your Frontend applications is an ongoing process; you need to be proactive about what you implement daily. Data-loading patterns are only one of a few ways you can use to improve your application performance.
But it is best to consider the common pitfalls before making any drastic changes to how your application is structured and consumes and loads data.
If you’re interested in exploring the references, you can check out:
I hope you found this article helpful. Please join the forum discussion below if you have any questions or comments.
(yk, il)
via Pixel Lyft https://ift.tt/aFlQ4ui
Whether you’re looking to delve into another world or keep it clean and simple, this month’s projects are sure to intrigue you.
Check out what the Webflow community’s been up to.
Immersive experiences
Creative design can make site visitors feel like they’re being pulled into another world. Dive into these websites to experience a new place.
Design Made Cool
Chinmay Choudhury’s portfolio Design Made Cool promises “truly immersive and memorable web experiences” right on the homepage. Once you start scrolling, you’ll get a taste of what that means.

Chinmay keeps you guessing with a mix of vertical and horizontal scroll-activated interactions. Animations, 3D elements and other-worldly graphics provide a peek into Chinmay’s mind while also showing off impressive design skills.
BelArosa Chalet
The BelArosa Chalet experience starts on the website. Rather than describe the posh accommodations, this site draws you in with a series of illustrations and scroll-activated animations.

You’re treated to an illustrated view of the mountains from the infinity sky pool, a cozy room warmed by a fire, a steam room oasis, and more. The entire homepage seems to mimic a storybook, telling a tale of luxury and relaxation.
Alba
Canada-based consulting firm, Alba, opens their site with an animated cartoon of a person walking two happy dogs. These black and white illustrations (and the peppy pups) follow you throughout the website.

As you scroll, the view point shifts to bring you up to a building, through an office window, then back outside to a park before finishing in outer space. Alba’s site does a great job of keeping you immersed in the cartoon world. Key phrases and call to action buttons appear in color, helping them stand out amongst the grayscale illustrations.
One page wonders
Simple structure does not mean boring design. These projects pack a lot of information and clever design into a single page website.
Diego
Brand designer and Webflow developer Diego immediately encourages visitors to explore their one page portfolio with a squiggly arrow prompting you to scroll.

Colorful cards shuffle into place as you move through Diego’s portfolio. After several project highlights, you arrive at a straightforward summary of who Diego is next to a slider containing various testimonials. This straightforward website packs a lot of information in a clean and simple layout.
Webtimise
Youness Bennamou announces his speciality as a creative Webflow developer with large, white text that takes up the opening page of this single page site, Webtimise.

To explore Youness’s site, you can either scroll through or click on any of the menu items in the top navigation bar to skip to the associated section. Images move into place with a wave effect reminiscent of a flag moving in the wind. Youness also added a fun cursor effect with emoji eyes appearing whenever the cursor hovers over a clickable image.
The Minimalists (cloneable)
True to its name, The Minimalists project keeps it simple with four colored rectangles and a logo in the center of the homepage.

Unlike many other one page websites, The Minimalists does not require scrolling to explore different sections. When you click on a section, a card shuffles into place, filling the page with the relevant information. The clean layout and intuitive navigation make this an ideal cloneable for straightforward sites with minimal content.
Customizable views
Each of these projects provides some cool customization options that allow site visitors to adjust aspects of the website to their liking.
King Bee Creative
The King Bee Creative homepage allows visitors to select both their preferred color and dominant hand.

Color Mode allows you to choose between classic dark mode and a lighter color scheme, “Café.” Dominant Hand caters to mobile accessibility by allowing users to move the hamburger menu and associated links to the left side of the screen — ideal for left handed users on mobile devices.
Changing the logo color on scroll (cloneable)
This fun cloneable project keeps the logo text stuck at the top of the page, changing colors as you scroll down.

Once you clone the project, you can modify the logo and select the colors that the animation will cycle through.
Spooker Design
Vladmir Mabille’s website, Spooker Design, includes 5 different color options that you can click through on the left side of the homepage.

After you select your preferred background color, you can also play around with Vladmir’s hobby wall by dragging letters onto the illustrated whiteboard. These small, playful touches fit right in with Spooker Designs’ artsy, early-internet aesthetic while also showcasing Vladamir’s design skills.
Submit your creations to Made in Webflow
Every month we select a few projects to feature on the blog, so make sure you are submitting your awesome projects to Made in Webflow — we can’t wait to see what you create!
via Pixel Lyft https://ift.tt/ap5tmsI
Author
Write something about yourself. No need to be fancy, just an overview.
Archives
April 2023
March 2023
February 2023
January 2023
December 2022
November 2022
October 2022
September 2022
August 2022
July 2022
 RSS Feed
