An Ultimate Guide On Sizing Spacing Grids And Layout In Web And UI/UX Design Smashing Magazine12/29/2022 A spatial system is a set of design guidelines about spacing, sizing, and dimensions of user interface components. It is a mandatory part of any design system, as it helps to create visual rhythm, creates consistent products, and reduces the amount of decisions designers make every day. A spatial system usually consists of four basics: a base unit, a spatial scale, grids, and sometimes layouts. Why is it so important? Let’s look at these two layouts in the image below. It’s an example of how proper organization of space can help designers create better layouts: 
We can assume that this is most likely an authorization form on a website. The first layout has some inconsistencies with spacing and does not have a clear vertical rhythm. However, when we look at the second layout, everything seems more clear. It’s because all the elements are adjusted to the 8pt spatial system, so vertical rhythm becomes predictable and clear. When a design does not have an immediately recognizable spatial pattern, users may find it inconsistent and unreliable. Now that we have an idea of what we are discussing, let’s start with grids since the organization of space usually begins with them. What Is A Grid?Grids provide a structure for the layout of elements, while a spatial system defines rules for using spacing and sizing. Early print designers used grids to organize text blocks and images into pleasing visual hierarchies for achieving better readability and scannability. The same basic principles can be applied to web and interface design. The Nielsen Norman Group wrote a good article about using grids in interface design. According to the article, there are three common grid types used in websites and interfaces: column grid, modular grid, and hierarchical. I suggest considering another type that came from graphic design — a baseline grid. In this article, we will not go deep into the topic of grids but consider them in the context of a spatial system. 
A column grid is the most popular grid in web and interface design. It helps to organize content into evenly spaced vertical columns with gutters between them. A modular grid extends the column grid by adding rows to it. It helps us to organize content into a matrix structure, so it is very helpful for e-commerce, galleries or card layouts. With a baseline grid, things get more complicated. Let’s take a closer look at it: 
A baseline grid is a dense grid of equally spaced horizontal lines. As I mentioned before, It came to us from graphic design, where all texts flow vertically along the baseline, creating a similar rhythm. In order to align all the elements on this grid, it is necessary that all spacings and dimensions are multiples of the interval value between the lines. In order for us to do this, we need to create a clear spatial system. Let’s start with a base unit.
More after jump! Continue reading below ↓
Base UnitA spatial base unit is a number by which all composite grids, dimensions, margins and frames are divided. Choosing a base unit value is the first and the most important step since the entire spatial system will be based on this value. Most systems use an 8pt spatial base unit with a 4pt half-step, for example, design systems like Google’s Material Design, Atlassian Design System, Adobe’s Spectrum Design System, etc. This is because 8 itself is a very convenient number. 
Many screen sizes are divisible by 8 (320px, 768px, 1024px, etc.), which makes scaling for a wide variety of screen sizes easy and consistent. Also, we can easily divide it by 2 or 4 to get fractional values. Look at the image below: 4pt is a @0.5 of an 8pt base unit, and 2pt is a @0.25: 
Fractional values are very convenient when we work with elements that need a more flexible system, for example, icons, typography, and a baseline grid. Therefore the interval between lines in baseline grids is also half the base unit. Atlassian Design System uses this approach. Look at the image below: they have a great baseline grid and typography system, which is aligned by line height and baseline at the same time, although usually, on the web, we place texts by a line height instead of a baseline, just like in graphic design. 
Another nice feature of an 8pt base unit is a perfect balance between the visual distancing and the number of variants. If we take all the linear values in the range from 0pt to 120pt, with an 8pt base unit, we will get 15 different values; with a 10pt base unit, we will get only 12 values; and with a 5pt base unit, we will get all 24 values! On the other hand, there are some teams that prefer to use a 5pt base unit. For example, Adidas and Upwork websites are built using a 5pt base unit. They don’t have open design guidelines, but If we inspect the code, we can see values that are multiples of 5. 
However, keep in mind that choosing an odd value for a base unit can cause some problems. There are some devices that have @1.5 scale ratio to the original size. Odd values will become fractional, and splitted pixels will be blurred and create visual noise. 
You can choose any value for a base unit: 4pt, 5pt, 6pt, 8pt, 10pt. Hence your choice should depend on the overall product and brand aesthetic you are going for. When you have chosen a base unit value, the next step is defining a spatial scale. Summing up, choosing a small value for a base unit will create too many variables in your spatial system. It will be hard to notice the difference between adjacent values; for example, a 2pt base unit will create 12pt, 14pt, and 16pt values. Contrariwise choosing a large value for a base unit will create too few variables in your spatial system. The difference between adjacent values will be too large; for example, a 16pt base unit will create 16pt, 32pt, and 48pt values.
More after jump! Continue reading below ↓
Spatial ScaleThe next step is defining a spatial scale. These are the very values or tokens that we use for margins, paddings, and dimensions of UI components. There are several approaches to the formation of a spatial scale. Let’s walk through them. Some teams use a linear spatial scale where each step is a fixed base unit increment. For example, Wave Design System is based on a linear spatial scale with an 8px base unit (8px, 16px, 24px, 32px, etc.). In my opinion, however, It creates too many options to choose from, especially when it comes to large values. Let’s consider the image below. It’s hard to notice the difference between two adjacent values larger than 72px, isn’t it? When do we use 104px and 112px? What is the difference between them? 
On the other hand, you can use scales based on Golden Ratio, Geometric Progression, or other mathematical rules. For example, Pega’s Bolt Design System uses Geometric Progression with a factor of 2x for their spatial scale. 
Hence if at a linear scale, we may have a bunch of unnecessary values, then with the geometric progression, we may lack many useful ones. In this case, some teams just break their systems and use custom values, not from the scale. For example, Pega’s Bolt Design System uses custom values for margins and paddings for their card component. We can find this out by inspecting the CSS styles via the browser. Despite all these advantages, this approach has a drawback, which I think is essential — it is very easy to spoil the consistency of a product. Why make rules if you break them later? 
I prefer to use a linear scale, remove all unnecessary values, especially larger than 72px, and add useful ones. The most popular design systems use this approach too, for example Adobe’s Spectrum Design System or IBM’s Carbon Design System. Remember that all variables should be reasonable and visually distinguishable. 
Another thing to consider is naming spatial scale values. Roughly speaking, a spatial scale is a set of constants or tokens, and their names should be the same in both code and design. This will help designers and developers speak the same language and reduce the number of visual bugs. Because there is no universal solution for naming, you can name spatial scale values the way you and your team like the most. For example, IBM’s Carbon Design System uses numbers from ‘1’ to ‘13’, Adobe’s Spectrum Design System uses numbers from ‘50’ to ‘1000’, Bootstrap uses names from ‘xs’ to ‘xxl’, Salesforce’s Lightning Design System uses names from ‘xxx-small’ to ‘xx-large’. 
How To Use A Spatial SystemWhen we have chosen a base unit and defined a spatial scale, we may have a question: how to use it properly? Let’s figure that out. As we know, spatial scale applies to margins, paddings, and dimensions. For width or height, we just set a value from a spatial scale. It is ok to set only height or only width if we cannot predict the content of the component, so it will hug the content and stretch dynamically. But with margins and paddings, things get more complicated. Look at the image below. As you can see, there are three types of spacing: inner spacing, vertical gaps, and horizontal gaps (or inline spacing). 
Vertical and horizontal gaps are white spaces between UI elements, components, and sections. We will assume that in design, these gaps will be transparent rectangles with strict height or width definition, while in web development, they will be in the form of ‘margin’, ‘top’, ‘right’, ‘bottom’, and ‘left’ CSS properties. For their values, we should use spatial scale values, nothing special. Inner spacing, or paddings, is white space inside the borders of UI components. In design, we can use it as auto layout properties or the same transparent rectangles. In web development, it will be in the form of ‘padding’ CSS property. Sometimes it’s not possible to use spatial scale values both for inner spacing and dimensions of UI components. Let’s look at the following example: 
In the above image, we have two buttons. The label’s line height is 20px (@2.5 of the 8px base unit). If we set a strict height of 32px for the first button, it will have 6px top and bottom paddings. The spatial scale includes the 32px value, but it does not include the 6px value. And if we set strict top and bottom paddings of 8px for the second button, it will have a 36px height. The spatial scale includes the 8px value, but it does not include the 36px value. Which one is the right choice? If we can predict the content or its size, we could set strict size properties. For example, we know that the button can have only 1 line of text inside, so we can set a strict height value from the scale. Therefore, the first button is made correctly. Components, where we can set strict size properties, are the key to creating rhythm in the overall composition. 
But if the content of the component is less predictable, we could set strict internal paddings. For example, we don’t know what the content of the table row component will be, so we can set strict internal padding from the spatial scale and let the height of the component depend on the content. 
ConclusionSumming up, we saw that space is one of the core elements of design. The spatial system is a mandatory part of any design system, and it helps to achieve consistency, create visual rhythm, limit decision-making, and help different teams stay on the same page. There are no good or bad spatial systems — every system has its own pros and cons. Create your system based on the needs of your product and the overall brand aesthetics you are going for. Remember that a spatial system is a tool, i.e. it should help you to create better products, and not limit you.
More after jump! Continue reading below ↓
(ah, il) via Pixel Lyft https://ift.tt/Rr7f9Sn
0 Comments
Do you want to send emails from your WordPress website? Do you want them to be delivered directly to inboxes of intended readers instead of spam? This is where SMTP plugins for WordPress come in! They highly improve the chances of your emails being delivered. They do this by automatically configuring WordPress SMTP and therefore allowing you to send WordPress emails via an SMTP server. What is SMTP?SMTP stands for Simple Mail Transfer Protocol. These are guidelines for submission and delivery of outbound and inbound email over the internet. It provides aunthentication for your emails so they don’t end up in spam folders. SMTP authenticates domains associated with your WordPress website. This is a way of ensuring that the email is coming from a real source that can be identified. In short, it’s not spam sent from a fake address or fake domains. 4 Best SMTP Plugins for WordPress1. WP Mail SMTP
  
With over 3 million downloads, WP Mail SMTP has become the most popular SMTP plugin for WordPress. And for good reason. First, it ensures reliable delivery of your emails by configuring your WordPress website Secondly, it offers you an opportunity to use built-in SMTP providers by bringing them all in one plugin. You don’t have to use different plugins for different providers. In fact, it offers a setup wizard that makes it extremely easy to connect with these providers. Providers include: SendLayer, SMTP.com, Sendinblue, Mailgun, SendGrid, AMazon SES, Postmark, SparkPost, ZoHo Mail and more. It also works with major email providers like Gmail, Yahoo, Outlook, Microsoft. In addition, it comes with documentation for connecting to each. You can check email reports from your dashboard. The report is a chart showing confirmed, unconfirmed, and failed emails. It also includes email opening and click counts. Outgoing emails are logged. This allows you to see status, content, source, and recipient details. Finally it offers safe migration of your setting if, you’re planning on switching from your old SMTP plugin. This is a freemium plugin, meaning it has a free version with a certain amount of features available for free. And if you want more features you’ll need to get the pro version. 2. Easy WP SMTP
  
Simplicity is what Easy WP SMTP. It does not come with an intimidating number of features. This makes it perfect for beginners. And it is completely free. Using this plugin to manually configure and send out all your emails via an SMTP server is easy. And if you have Gmail, Hotmail, or Yahoo accounts you can connect them fairly quickly. However, if you want to connect to email third-party mail service providers like SendGrid, SendLayer and others, it is not as easy. It is up to you to find SMTP details of the host providers. It doesn’t come with a connecting wizard to help smooth out this process. The plugin gives you the option to enable debug logging to see if the emails are getting sent out successfully or not. It also gives you the option to specify a reply-to email address. 3. Post SMTP Mailer
  
To make sure that your emails will be delivered, Post SMTP uses the zend-mail library to replace the default WordPress SMTP library and PHPMailer. It has a free and pro version. The plugin comes with a setup wizard to connect quickly with SendGrid, MailGun, Gmail and other providers. The plugin also does a connectivity test to detect firewalls and eliminate configuration mistakes. It also offers an email log, so that from your WordPress panel you can view all problems that have occured. In addition, it uses OAuth 2.0 which discourages storing email passwords in the WordPress database and increases password security. Finally, where hosts like Godaddy and BlueHost block standard SMTP, this plugin circumvents that block by delivering the emails via HTTPS. It is compatible with Contact Form 7, WooCommerce, Mailster Newsletter Plugin, Gravity Forms, Elementor forms, and more. 4. Gmail SMTP
  
This plugin is ideal if you want to send your WordPress emails using your Gmail account. It reroutes Gmail through Gmail SMTP server, which use OAuth 2.0 to authorize access to the Gmail API. This system is more secure and you don’t need to enter your Gmail username or password. Gmail SMTP offers basic authentication and email testing. ConclusionSMTP plugins help you configure your WordPress SMTP sending so you send emails that have a high chances of being delivered to readers inboxes. The plugins I’ve selected enjoy and high reputation among users. On CodeCanyon you will find newsletter plugins that will allow you to send emails and newsletter once you configure SMTP settings for your WordPress website. via Pixel Lyft https://ift.tt/2xlQrZD This is part of a series of posts that compare WordPress other platforms like Wix or Squarespace. These are closed-source services, so you don’t actually have full control over your website. This is a deal-breaker for some people who will prefer open-source WordPress alternatives such as Joomla and Drupal. In this post, I will give you a detailed comparison of Drupal with WordPress. Drupal and WordPress: A Brief IntroductionWordPress has been around for about two decades. It is a completely free and open-source content management system that you can use to build all kinds of websites. WordPress is the most popular platform for creating websites.   
There are two different versions of WordPress: the open-source project at WordPress.org and the WordPress.com version which will host your WordPress website for you. In this post, we will be comparing Drupal with the open-source version.   
It will probably be hard for you to believe but Drupal has been around for even longer than WordPress. Yes, that’s right. Drupal was created in 2000 and became an open source project in 2001. Drupal might not be as popular as WordPress when it comes to sheer numbers. However, it still powers around 2% of all the sites on web. In short, both Drupal and WordPress are free and open-source CMS platforms that were written in PHP. Drupal vs WordPress: Ease of UseYou can download installation files for both WordPress and Drupal from their respective sites. These files can be extracted and installed locally as long as your system comes with Apache, MySQL and PHP support, or has programs like MAMP or XAMPP. The installation process is similar on both platforms where you set up a database and then follow instructions shown on installation screens. You can also install Drupal using Composer which is actually the recommended installation method but not very beginner friendly. Now let’s talk about ease of use. Drupal has historically been harder to use compared to WordPress. The user interface has always pretty bland and it is difficult to navigate around in the back-end when figuring out how to set up your website as a beginner. With basic knowledge of web development, you can be ready to go with a basic WordPress website in around a day. This is not the case with Drupal where you will have to spend significant amount of time in learning about the platform. Lack of intuitive interface and some common CMS features was a big hurdle for new users. However, things have improved significantly in newer versions of Drupal and they are only going to get better. However, when it comes to ease of use WordPress still a clear winner. Ease of use is one of the major reasons why WordPress is much more popular compared to Drupal. Winner: WordPress is still easier to use and more beginner-friendly, but Drupal is improving all the time. Drupal vs WordPress: Content ManagementNot all blogs and websites have the same content management needs. A simple blog about photography or gardening might only have a couple of content writers, while larger organizations will have dedicated teams with tens or hundreds of people who manage the website content. Content management is one area where Drupal shines over WordPress. Drupal has a much more powerful access control system where you can create new roles and assign permissions to them using the built-in capabilities of the platform. Compare this to WordPress which only comes with 5 built-in user roles. Similarly, you have more flexibility when it comes to creating custom content types and using taxonomies in Drupal. The built-in support for creating multilingual websites is also icing on cake. WordPress requires you to use third-party plugins in order to access the same set of features.   
How does all that help you? Let’s say you are creating a college website or some other forum where a lot of users will publish content. Using Drupal would be a better choice here because you can create multiple custom post types and assign roles as you like to different users. Drupal is a lot better than WordPress when it comes to creating and managing content on large websites. The more complicated the content, the more obvious Drupal becomes as the platform of choice. Winner: Drupal has more powerful tools for managing content at scale. Drupal vs WordPress: Design OptionsEveryone wants their website to stand out from the competition in the hopes of getting more clients or higher revenue. One easy way to do that is with themes. A theme is basically a bunch of files usually created by a developer to define how the content of a website is presented to users. Both WordPress and Drupal are popular CMS platforms so quite a few developers create themes for them. This means that you can easily find some free or paid themes for use with your websites. Since the platforms are open-source, you can also create your own custom themes from scratch or hire someone else to do so. The official WordPress theme repository has over 10,000 free themes while Drupal offers around 3000 themes. However, the number of available themes in Drupal drops to 68 when you set the compatibility to the latest version Drupal 10. The theme choices will improve as time passes by.   
There are many marketplaces like Themeforest which offer premium themes for both WordPress and Drupal. They are responsive and very sophisticated making them ideal for use in production websites. Winner: WordPress wins this round due to availability of more themes for you to use with your websites. Drupal vs WordPress: Extending FunctionalityNo CMS platform can provide you all the features that you might want in your website. The easiest way to extend the functionality of your website in WordPress is to install plugins. The same concept exists in Drupal ecosystem but these files are called modules. Again, both WordPress and Drupal have a large repository of plugins/modules on their official websites. WordPress offers around 60,000 different plugins while Drupal has over 32,000 modules. You can also filter the modules in Drupal based on your installed version. This does take the number of available plugins down to 3,100+ for Drupal 10. It is evident that WordPress offers many more plugins when compared to Drupal making it a better alternative if you plan to extend the core functionality. I would like to clarify that Drupal isn’t far behind when it comes to the ability to extend website capabilities. It does have quite a few very capable plugins. For example, let’s say you want to create an eCommerce website using Drupal. You could use the specially developed open-source Drupal Commerce framework along with a variety of eCommerce modules. Drupal vs WordPress: Maintenance and CostProper upkeep of a website is just as important as creating a website if not more. Both WordPress and Drupal release updates on a regular basis to add new features and patch security vulnerabilities. Any plugins or modules that you might have installed also need to be updated and tested for full compatibility with the rest of the website. Updating Drupal has been a pain since forever. It is a difficult and time-consuming process which can occasionally get expensive. On the other hand, updating WordPress is a lot easier, faster and beginner-friendly. Drupal has taken some steps to make the update process easier. However, it still has a long way to go before it becomes as capable as WordPress. Availability of free themes, plugins and modules keeps the cost of development relatively down for regular websites created using either Drupal or WordPress. However, using Drupal means that you will have to spend relatively larger amount of money on developers because you won’t be able to handle many things on your own. Winner: WordPress will be easier and cheaper to maintain in the long run. ConclusionsBoth Drupal and WordPress are excellent CMS platforms for you to create websites. They have their own strengths and weaknesses.
WordPress has been developed with ease of use in mind and it delivers in this respect. You can get up and running faster with WordPress as long as you are not creating over-complicated websites. Drupal is more suited for complicated projects where the content goes beyond regular blog posts. via Pixel Lyft https://ift.tt/5l9psPn You know, this is the time of year where Chris normally publishes a big ol’ reflection of the past year. The first one was published in 2007, the same year CSS-Tricks began, and it continued all the way through 2021 without missing a beat. Having been a CSS-Tricks reader myself all those years, I’d hate to see that change. So, here we are! 2022 was sure a heckuva year as far as transition goes. At this time last year, we were looking ahead at some goals for the upcoming year (which we’ll get to) but wound up joining DigitalOcean. That was a massive sea change (pun intended) and yet you stuck with us the whole way. It really means a lot to me that so many of you come here to read the things that I and a slew of other guest writers publish here. It just ain’t a community (or any fun) without y’all. Thank you! 
This is the last post we’re publishing this year as we hang up our Gone Fishin’ sign for the holidays. We’ll be back January 9 with a spate of content that’s fresh from the oven. OK, this is where we start digging into the site’s analytics. That’s something we’ve always been transparent about and will continue to do. It’s not like our numbers are in some off-limits black box, and the hope is that sharing them somehow helps you and your business. Overall trafficOverall, Google Analytics is showing a total of 64m pageviews for the entire year. That’s wayyyyy down from last year’s 88m, which is alarming at first glance. I mean, who wants to see a 27% drop in year-over-year traffic? But there’s good reason for that because we published a wayyyy less content this year. We all know Chris was a prolific writer (and still is, of course), often spitting out multiple posts a day. It’s sorta like we lost our most productive contributor for the bulk of the year. Let’s compare the publishing activity for the last few years:
A 27% drop in pageviews is a lot less concerning considering we published 43% fewer articles than last year, and a whopping 67% fewer than 2020’s overall total. Hmm, I don’t feel like I’m working 67% less… And all of this comes with the caveat that this is just what we get from Google Analytics. In past years, Chris has compared those numbers with stats from Cloudflare (the CDN layer that sits on top of the site) and Jetpack (the plugin that connects our self-hosted WordPress site to WordPress.com’s SaaS-y features). The results are always consistently inconsistent to the extent that I’m not even bothering to look this time around. (Alright, alright maybe just Jetpack… which shows 59.9m pageviews — oddly more than 2021’s 55m total.) Articles, by the numbersThis is what I always look forward to each year! Here are the top ten articles in 2022 that were published in 2022:
I’m actually surprised that last one wasn’t higher on the list. And I’m really stoked to see one from the Alamanac in there, especially because Mojtaba chipped away at all of the CSS Grid properties over the past year and half and he knocked it way out of the ballpark. I thought I had a good handle on grid until I started reading all of the gold nuggets he packed into each property. There’s so much to learn in there and Mojtaba has a knack for clearly explaining complicated things. I’m hoping to update the CSS Grid guide with all that fresh information (but more on that in a bit). I love seeing the CSS Cascade Layers guide in there, too! I had so much fun working with Miriam on it. If you didn’t know it, she’s an editor for the spec. It’s a treat (and honor, really) to host her work here and make it available for us all to bookmark and reference. Here’s 11-20 for kicks:
All posts that were published in 2022 make up 4.8m pageviews, or about 7.8% of all pageviews. Our most viewed article is always the ol’ Flexbox guide which garnered 5.8m views this year. I’d love to see our new content outpace that one item, and I believe that would’ve easily happened if we’d kept up the pace of publishing. Back of the napkin math here, but we may have been around 67m pageviews if we had published 540 more articles to match last year’s number of published articles. If we take a few steps back, then we can see the most-viewed articles from the past year, regardless of when they were published:
Yep, nearly identical to last year. And the year before. And the year before. And… well, almost. “Gradient Borders in CSS†is new, bumping the Speaking of the properties in the Almanac, I wanna see what y’all referenced most this past year:
One pseudo at the top and nothing but properties after that. Interesting, given that relational pseudo selector functions like NewsletterThe numbers here are way too messy to draw any insightful conclusions. After moving to DigitalOcean, we had to scrub our list of 91K+ subscribers for compliance purposes and the number plummeted as a result. If you were dropped from the list, you can re-subscribe here. The good news? We’re still doing the newsletter! We actually fired it back up in August after a five-month hiatus. We were on a weekly cadence, but are at once a month now while yours truly is authoring it. I sure hope to bump it back to a weekly publication. (I miss you, Robin!) Site updatesIt’s been mostly about keeping the ship afloat, if I’m being honest. Other than some minor tweaks and maintenance, the site is pretty much where it was at this time last year. That will change big time in 2023. If you’ve been keeping up with our monthly Behind the CSScenes updates, then you know that we’re planning to migrate CSS-Tricks from WordPress to the same homespun CMS that DigitalOcean uses for all of its (stellar) community content. That work kicked off a couple months ago and should be done within the first half of the year. You can bet that we’ll keep you updated along the way. Besides a fresh design and a new back-end, it should be business as usual. If you have any questions about that work and what it means for your favorite front-end publication, please do hit me up in the comments or shoot me an email. If you haven’t seen it yet, here are a few comps that our designer, Logan Liffick, put together: 2021 goal reviewOy, I’m hesitant to even look. All the effort it’s taken to integrate with DigitalOcean and find a new rhythm dominated everybody’s time, leaving precious little to take a crack at Chris’ goals, which were:
2023 goal-settingNew year, new goals, right? Allow me to put a bunch of words in the team’s mouth and project what I feel are top priorities for us heading into 2023:
Thank you so, so, so much!This is my dream job and I wouldn’t have it without readers like you. I can’t believe it’s been eight years since my very first article was published and that I’m still here, And thanks to all the fine folks here at DigitalOcean who have made a great home for CSS-Tricks. Extra special high-fives to Haley Mills, Sydney Rossman Reich, Bradley Kouchi, Karen Digi, David Berg, Matt Crowley, Logan Liffick, and Kirstyn Kellogg for getting me personally up to speed and making me feel so welcome here. It’s a great place to be. Forward, we go! via Pixel Lyft https://ift.tt/MrNYpbu As we move into 2023, there are an increasing number of ways companies can engage with their customers. And as the number of apps, browser extensions, social media feeds, newsletters, vlogs, and podcasts grows, you can be forgiven for thinking that websites are a little less essential than they were in say, 2021. However, the truth is that websites remain an irreplaceable part of the digital landscape and they will continue to be into 2023 and beyond. Websites, as the keystone of a centralized, privately run digital experience couldn’t be more relevant. Unlike competing technologies, websites allow almost total control of their source code, and that provides an opportunity for skilled designers and developers to compete against the biggest names in their clients’ industries in a way that simply isn’t possible in tightly governed systems like social media. Not only does quality web design help businesses increase their traffic, but it can increase the quality of that traffic; an attractive and user-friendly web page will encourage web users to stay on the page longer, and explore more of the content it links to.
Websites vs. Social MediaFor many brands, the option they turn to for connecting with customers is social media. Particularly platforms like Facebook and Instagram. While billions of us are happy to while away our free time on social media, it’s not a great platform for informed decision-making or task fulfillment. For any form of productivity, websites are superior:
Websites vs. AppsWhen it comes to owning a piece of the internet, a connected app feels like ownership. However, websites have a number of benefits over an app, from a superior user experience to lower development costs. And ultimately, apps are also controlled by 3rd parties.
Websites vs. Podcasts and VlogsThere’s no question that podcasts and vlogs are engaging types of content. However, they are very limited when it comes to different kinds of experience. These tend to be passive, linear experiences. Even if your podcast opens itself up to listener interaction, your customers are still passive consumers.
Websites in 2023 and BeyondIn 2023 websites will still be a critical part of a successful business strategy and web designers will continue to be essential members of any team. Websites continue to offer numerous benefits over other technologies including increased flexibility, cost-effectiveness, and superior search engine opportunities. Unlike social media platforms that allow you to customize a few assets like avatars and colors, websites can be completely customized to fit the tone and style of a brand. Additionally, websites have a far lower barrier to entry than podcasts, vlogs, or apps. While apps may offer a richer set of features than a website, that is offset by the restrictions on platform and device capabilities that apps impose. Websites will continue to evolve as the tech landscape changes. New ideas for consuming digital media will appear over time, offering unique new experiences — for example, mass adoption of AR (Augmented Reality) is just around the corner. However, the website is perfectly evolved for the types of simple customer interaction that businesses rely on, and will continue to matter in 2023 and beyond.
Featured image by fullvector on Freepik via Pixel Lyft https://ift.tt/pWGczRk Whether you’re a social media addict or a hesitant acceptor of its powers, one thing remains true: it’s not going anywhere. So, regardless of whether you’re new to the industry or if your brand has been around for years, you’re going to need these social media hacks under your belt to have your marketing strategy sing. 
There’s a misconception that to do well on social media you have to be a superstar celeb with hundreds of thousands of followers. And sure, we all wish we could have Kardashian-level followings that bring in business with the click of a button. But the good news for your small business is: that’s not the only way to grow your brand on social media. In fact, campaigns that work with micro-influencers with smaller, more dedicated followers are actually proven to be up to 11 times more successful. So, with a little digital know-how, you can still reach expansive new audiences, gain new customers, stay connected with your loyal fans, and even dip your toe into different kinds of digital marketing—all by using the major social media platforms. And you don’t even need to understand that algorithm (well, not completely)… 14 social media hacks for small businesses
|


1 |
<?php
|
2 |
|
3 |
/**
|
4 |
|
5 |
* @package Akismet
|
6 |
|
7 |
*/
|
8 |
|
9 |
/*
|
10 |
|
11 |
Plugin Name: Akismet Anti-Spam
|
12 |
|
13 |
Plugin URI: https://akismet.com/
|
14 |
|
15 |
Description: Used by millions, Akismet is quite possibly the best way in the world to <strong>protect your blog from spam</strong>. It keeps your site protected even while you sleep. To get started: activate the Akismet plugin and then go to your Akismet Settings page to set up your API key.
|
16 |
|
17 |
Version: 4.1.7
|
18 |
|
19 |
Author: Automattic
|
20 |
|
21 |
Author URI: https://automattic.com/wordpress-plugins/
|
22 |
|
23 |
License: GPLv2 or later
|
24 |
|
25 |
Text Domain: akismet
|
26 |
|
27 |
*/
|
This tells WordPress what your plugin does, where to find out more about it, and who developed it. It also gives information about the version number and the text domain and path for internationalisation, as well as the license.
WordPress takes this information and uses it to populate the plugins screen in your site. Here’s how Akismet looks on that screen:


You can see that the information provided in the plugin file is used to populate this entry and provide links.
Other information about the plugin is contained in the README.txt file, which is used to populate the plugin’s page in the plugin directory:


The main plugin file will also contain the code that makes the plugin run. Sometimes that will be all the PHP for the plugin, but for larger plugins, there’ll be calls to include files containing extra code. This helps you organise your code and means you don’t have one long, disorganised file that’s difficult to work with. I’ll show you how to use include files later in this guide.
Folder Structure
While there are no hard and fast rules on how you organise the folders in your custom WordPress plugin, it makes sense to adopt the same structure that other plugin developers use. This will familiarise you with the way other plugins are built and mean that if you share your code in future, it will make sense to other people.
Folders in your plugin might include:
- css or styles for stylesheets
- scripts for JavaScript
- includes for include files
- templates for template files that your plugin outputs
- assets for media and other asset files
- i18n for internationalisation files
You might find you need to use more folders to build a WordPress plugin if your plugin is large or complex. For example, WooCommerce has folders for packages, sample data, and more. These in turn include subfolders for things like blocks and admin files.


Scripts and Stylesheets
If your plugin outputs content that needs styling, either in the front-end or in the admin screens, you may need stylesheets. And if your plugin will use scripts, you’ll need files for these.
It makes sense to keep these in their own folder, even if you only have one of each. You’ll need to enqueue these scripts and stylesheets using a dedicated function in your main plugin file. I’ll show you how to do this when we’re building the plugin.
Include Files
If your plugin needs organisation, you can do this by splitting your code into multiple files, called include files. You then put these files into their own folder and call them in your main plugin file using an include or require function.
This way, you can keep the bulk of your code in a well-organised file structure while your main plugin file remains lean and minimal.
If your plugin isn’t all that big, you don’t need to use include files: just add your code to the main plugin file. But you might find you need to organise this file and reorder functions within it as you add them, to maintain a logical structure.
These are the most common elements of a plugin. We’ve seen in the WooCommerce example that there can be many more. Or in smaller plugins there can be many fewer. But as you develop more plugins, you’ll find yourself using these elements more and more.
How to Run Your Plugin Code: Options
When you add code to your plugin, it won’t do anything until you activate it in some way. There are a few methods you can use to activate your code or pull in code from WordPress:
- functions
- action and filter hooks
- classes
Let’s take a look at each of these.
Functions
Functions are the building blocks of WordPress code. They’re the easiest way to get started writing your own plugins and the quickest to code. You’ll find plenty of them in your themes’ files too.
Each function will have its own name, followed by braces and the code inside those braces.
The code inside your plugin won’t run unless you call the function somehow. The simplest (but least flexible) way to do that is by directly calling the code in your theme or somewhere else in your plugin.
Here’s an example function:
1 |
tutsplus_myfunction { |
2 |
|
3 |
// code goes here
|
4 |
|
5 |
}
|
To directly call that function in your theme, you’d simply type tutsplus_myfunction() in the place in your theme template files where you want it to run. Or you might add it somewhere in your plugin… but you’d also need to activate the code that calls it!
There are a few limitations to this:
- If the function does something that isn’t just adding content somewhere in a theme template file, you can’t activate it this way.
- If you want to call the function in multiple places, you’ll have to call it again and again.
- It can be hard to keep track of all the places you’ve manually called a function.
It’s much better practice to call functions by attaching them to a hook.
Action and Filter Hooks
By attaching your function to a hook, you run its code whenever that hook is fired. There are two types of hook: action hooks and filter hooks.
Action hooks are empty. When WordPress comes to them, it does nothing unless a function has been hooked to that hook.
Filter hooks contain code that will run unless there is a function hooked to that hook. If there is a function, it’ll run the code in that function instead. This means you can add default code to your plugin but override it in another plugin, or you can write a function that overrides the default code that’s attached to a filter hook in WordPress itself.
Hooks are fired in three ways:
- By WordPress itself. The WordPress core code includes hundreds of hooks that fire at different times. Which one you hook your function to will depend on what your function does and when you want its code to run. You can find a list of WordPress hooks in the developer handbook.
- By your theme. Many themes include action and filter hooks that you can use to add extra content in key places in your website’s design. And all themes will include a
wp_headandwp_footerhook. Combine these with conditional tags, and you can run specific code on certain types of pages in your site. - By your plugin or other plugins. You might add an action hook to your plugin and then add functions in your include files that attach code to that hook. Or you might write a filter hook and then have a function that overrides its contents under certain circumstances. Alternatively, if you’re creating a plugin to complement another plugin, you can hook your functions to the existing hook in the third-party plugin. I’ve done this with WooCommerce, for example, to customise what’s output on product pages.
Some of this is more advanced, but with your first plugin, you’ll probably be hooking your functions to an action or filter hook output by WordPress itself, most likely an action hook.
Classes
Classes are a way of coding more complex features, such as widgets and customizer elements, that make use of the existing WordPress APIs.
When you write a class in your plugin, you’ll probably be extending an existing class that’s coded into WordPress. This way, you can make use of the code provided by the class and tweak it to make it your own. An example would be the customizer, where you might write a class including a color picker, making use of the color picker UI that’s provided in the existing class for the customizer.
Using classes is more advanced than functions, and it’s unlikely you’ll do it in your first plugin. To find out more, see our guide to classes in WordPress.
If you do write classes, you’ll still have to use actions or filters to get them to run.
Best Practices to Make a WordPress Plugin
Before you start coding your plugin, it helps to understand best practices for plugins so your code can be high quality right from the start.
Here are some best practices for creating a WordPress plugin:
- Write your code according to WordPress coding standards. If you want to submit your plugin to the plugin directory, you’ll have to do this.
- Use comments throughout your code so other people can work with it—and so you remember how your code works when you come back to it in the future.
- Name your functions, hooks, and classes using prefixes so they are unique to your plugin. You don’t want to give a function the same name as another function in a different plugin or in WordPress core.
- Organise your folders logically, and keep your code separated so other people can understand it and so you can add to it over time without it becoming a mess.
You might think that using best practice isn’t necessary because it’s just you working with the plugin. But your custom WordPress plugin might grow over time, you might let other people use it, or you might sell it. Or you might come back to it in two years and not be able to remember how the code is organised! These are important things to keep in mind before you learn how to create a WordPress plugin.
How to Make a WordPress Plugin in 4 Steps
At last! You have a grounding in how plugins work, and it’s time to roll your sleeves up and create your first plugin. I’m going to take you through the process of creating a simple plugin that registers a custom post type.
This is a very common use of a plugin, and something you might then build on over time to add custom template files for your custom post type or other functionality.
I’ll show you the basic code for the plugin and give you an introduction to how you might add to it over time.
1. Create the WordPress Plugin Folder
Even if your plugin is starting out small with just one file, it’s good practice to give it its own folder. Start by creating a folder in your wp-content/plugins directory. Inside that, create a PHP file for your plugin.
Give them both a name that makes sense and includes a prefix. I’m calling my folder tutsplus-register-post-types and my file tutsplus-register-post-types.php.
Now open your plugin file and add the commented-out information at the top. You can take mine below and edit it to reflect the fact that this is your plugin, not mine.
1 |
<?php
|
2 |
|
3 |
/*
|
4 |
|
5 |
Plugin Name: Tuts+ Register Post Types
|
6 |
|
7 |
Plugin URI: https://tutsplus.com/
|
8 |
|
9 |
Description: Plugin to accompany tutsplus guide to creating plugins, registers a post type.
|
10 |
|
11 |
Version: 1.0
|
12 |
|
13 |
Author: Rachel McCollin
|
14 |
|
15 |
Author URI: https://rachelmccollin.com/
|
16 |
|
17 |
License: GPLv2 or later
|
18 |
|
19 |
Text Domain: tutsplus
|
20 |
|
21 |
*/
|
Now, if you save your file and go to the Plugins screen in your development site, you’ll see the plugin on the screen:


You can activate it if you want, but it won’t do anything yet because you haven’t added any code to it. Let’s do that.
2. Add Functions to Your Custom Plugin
Now it’s time to write the first function in our plugin. Start by making your plugin and adding the braces which will contain the code. Here’s mine:
1 |
function tutsplus_register_post_type() { |
2 |
|
3 |
// movies
|
4 |
|
5 |
$labels = array(
|
6 |
|
7 |
'name' => __( 'Movies' , 'tutsplus' ),
|
8 |
|
9 |
'singular_name' => __( 'Movie' , 'tutsplus' ),
|
10 |
|
11 |
'add_new' => __( 'New Movie' , 'tutsplus' ),
|
12 |
|
13 |
'add_new_item' => __( 'Add New Movie' , 'tutsplus' ),
|
14 |
|
15 |
'edit_item' => __( 'Edit Movie' , 'tutsplus' ),
|
16 |
|
17 |
'new_item' => __( 'New Movie' , 'tutsplus' ),
|
18 |
|
19 |
'view_item' => __( 'View Movie' , 'tutsplus' ),
|
20 |
|
21 |
'search_items' => __( 'Search Movies' , 'tutsplus' ),
|
22 |
|
23 |
'not_found' => __( 'No Movies Found' , 'tutsplus' ),
|
24 |
|
25 |
'not_found_in_trash' => __( 'No Movies found in Trash' , 'tutsplus' ),
|
26 |
|
27 |
);
|
28 |
|
29 |
$args = array(
|
30 |
|
31 |
'labels' => $labels,
|
32 |
|
33 |
'has_archive' => true,
|
34 |
|
35 |
'public' => true,
|
36 |
|
37 |
'hierarchical' => false,
|
38 |
|
39 |
'supports' => array(
|
40 |
|
41 |
'title',
|
42 |
|
43 |
'editor',
|
44 |
|
45 |
'excerpt',
|
46 |
|
47 |
'custom-fields',
|
48 |
|
49 |
'thumbnail',
|
50 |
|
51 |
'page-attributes'
|
52 |
|
53 |
),
|
54 |
|
55 |
'rewrite' => array( 'slug' => 'movies' ),
|
56 |
|
57 |
'show_in_rest' => true
|
58 |
|
59 |
);
|
60 |
|
61 |
}
|
This includes all the labels and arguments for your post type and (crucially) the register_post_type() function which is provided by WordPress.
I’ve used movies as my post type here as I’m creating an imaginary movie review site. You might want to use something different.
Now, if you save your file and go back to your site, you’ll see that nothing has changed. That’s because you haven’t activated your code. The method we use to activate the function here is by hooking it to an action hook provided by WordPress, the init hook. When you use a function provided by WordPress (such as register_post_type), you’ll find that there’s a hook that you should use. You can find details in the WordPress handbook entry for registering custom post types.
So let’s add the hook. Under your code, and outside the braces, add this line:
1 |
add_action( 'init', 'tutsplus_register_post_type' ); |
We use the add_action() function to hook our code to an action hook, with two parameters: the name of the action hook and the name of our function.
Now try saving your files and going back to your site. You’ll see that the custom post type has been added to your admin menu (assuming you’ve activated the plugin).


Nice!
Now let’s add an extra function, to register a custom taxonomy. Below the code you’ve written so far, add this:
1 |
function tutsplus_register_taxonomy() { |
2 |
|
3 |
// books
|
4 |
$labels = array(
|
5 |
'name' => __( 'Genres' , 'tutsplus' ),
|
6 |
'singular_name' => __( 'Genre', 'tutsplus' ),
|
7 |
'search_items' => __( 'Search Genres' , 'tutsplus' ),
|
8 |
'all_items' => __( 'All Genres' , 'tutsplus' ),
|
9 |
'edit_item' => __( 'Edit Genre' , 'tutsplus' ),
|
10 |
'update_item' => __( 'Update Genres' , 'tutsplus' ),
|
11 |
'add_new_item' => __( 'Add New Genre' , 'tutsplus' ),
|
12 |
'new_item_name' => __( 'New Genre Name' , 'tutsplus' ),
|
13 |
'menu_name' => __( 'Genres' , 'tutsplus' ),
|
14 |
);
|
15 |
|
16 |
$args = array(
|
17 |
'labels' => $labels,
|
18 |
'hierarchical' => true,
|
19 |
'sort' => true,
|
20 |
'args' => array( 'orderby' => 'term_order' ),
|
21 |
'rewrite' => array( 'slug' => 'genres' ),
|
22 |
'show_admin_column' => true,
|
23 |
'show_in_rest' => true
|
24 |
|
25 |
);
|
26 |
|
27 |
register_taxonomy( 'tutsplus_genre', array( 'tutsplus_movie' ), $args);
|
28 |
|
29 |
}
|
30 |
add_action( 'init', 'tutsplus_register_taxonomy' ); |
Again, you might want to change the name of your custom taxonomy. Here, I’ve made the taxonomy apply to the post type I’ve just registered (the third parameter of the register_taxonomy function). If you gave your post type a different name, make sure to edit that bit.
Now save your file and take a look at your admin screens. When you hover over your post type in the admin menu, you’ll see the new taxonomy.


You now have a working plugin. Well done!
Let’s take a look at how you might add to it.
3. Enqueue Stylesheets and Scripts
If you need to use custom styling or scripts in your plugin, you could add them right into your plugin file—but that’s not best practice. Instead, you should create stylesheets and scripts as separate files in your plugin folder and enqueue those, using a function provided by WordPress.
Let’s imagine you want to add styling for your custom post type. You could add this to your theme, but you might want to add some specific styling to the plugin to make the post type stand out from other post types in any theme.
To do this, you create a new folder inside your plugin folder called css (or styles, it’s up to you). Inside that folder, create a stylesheet called style.css, or you can give it a more specific name for clarity. I’m going to call mine movies.css.
You then need to enqueue that file in your plugin so that it can be used by WordPress. Add this to your main plugin file, above the functions you already have. I like to add enqueuing and includes first in my plugin file so I can see what other files are being activated.
1 |
function tutsplus_movie_styles() {
|
2 |
wp_enqueue_style( 'movies', plugin_dir_url( __FILE__ ) . ‘/css/movies.css’ );
|
3 |
} |
4 |
add_action( 'wp_enqueue_scripts', ‘tutsplus_movie_styles' ); |
If you save your file, you won’t see any difference in your admin screens—but if you’ve added posts of the custom post type and your stylesheet includes styling for them, you’ll now see that in the front-end of your site.
Note that the hook used for enqueuing both stylesheets and scripts is the same: they both use wp_enqueue_scripts. There isn’t a separate hook for styles.
Enqueuing scripts works in a very similar way. Follow these steps:
- Add a scripts or js folder to your plugin folder.
- Save your script files in that folder.
- Enqueue the script in the same way as the stylesheet above, replacing the
wp_enqueue_style()function withwp_enqueue_script().
4. Using Include Files
Another option as you develop your plugin is to create extra PHP files, known as include files. If you have a lot of these, you might create multiple folders for different types of include file, or you might just create one folder called includes.
There are a few functions you can use to include files, which you’ll find in our comprehensive guide to including and requiring files.
For example, in our custom post type plugin, we might create some code to vary the way the content of the page is output, using the the_content filter hook to amend the code being run each time the content is output on a product page.
Instead of adding this code to the main plugin file, you could add it to a separate file called movie-content.php and then write the code in that file for the way the content is output for movies.
To include this file in your plugin, you add a folder called includes to your plugin, and then inside that folder you add the content-movie.php file.
To include that file in your plugin, you add this code at the beginning for the main plugin file:
1 |
include( plugin_dir_path( __FILE__ ) . ‘includes/movie-content.php' ); |
You don’t need to hook this to an action or filter hook—just use the include_once() function in your plugin file. That will then call the code from the include file as if it was in your main plugin file at that point.
How to Extend or Edit an Existing Custom WordPress Plugin
Sometimes you might find a plugin in the plugin directory or from a plugin vendor that does most of what you need a plugin to do, but not quite all. Or you might be running a plugin and want to make some tweaks and customisations.
The fact that WordPress is open source makes this possible. You can take another plugin’s code and extend or edit it to make it work the way you want it to.
There are two ways to do this:
- Take an existing plugin and fork it—i.e. edit it so it works differently, is more reliable, or has extra features.
- Write your own plugin that extends the original plugin.
Taking an existing plugin and editing it is fairly straightforward: you make your own copy on a development site (never live!) and make edits to it as needed. Make sure you use version control to track your changes in case something goes wrong.
Extending a plugin by writing your own plugin is slightly more complicated, and won’t work with every plugin, but is a more robust way of doing things in my opinion.
Many of the most popular plugins will make extensive use of hooks and classes in their code. You can hook into action and filter hooks and extend classes to write your own code, which uses the existing plugin’s code as a base but then adds to or edits it.
For example, WooCommerce has so many functions, hooks, and classes that it has its own API and developer documentation. Each part of the WooCommerce system is powered by one or more of these functions, hooks, or classes. To make changes, you need to identify which code is driving the part of the system you want to change, and then write your own plugin which either attaches to the same hook(s) or extends the classes.
You’ll find you can create significant customisations to a plugin like WooCommerce in this way: I once used it to power a listings site that didn’t even include a checkout. I used hooks to remove all the elements I didn’t want and add new ones.
For some examples of how you can hook into WooCommerce and extend or edit it with your own plugin, see our guide to adding product descriptions to archive pages and to adding a product-based blog to your store. These examples just scratch the surface of what you can achieve, but they’ll give you an idea of how to start.
Taking It Further: Plugin Features
In this guide, I’ve shown you how plugins are coded and how to get started building a simple plugin.
Once you’ve got the hang of plugin development, you can build more complex and full-featured plugins to carry out more complex tasks on your site.
Let’s take a look at some examples.
Create Your WordPress Plugin Tutorials
Widget plugins involve working with classes but are a good introduction to the topic. Our guide to creating a widget plugin will help you do it.
On our blog, we’ve identified the best widget plugins for 2021, the best Facebook widgets, and the best Twitter widgets.
Shortcodes to Create a Plugin for WordPress
Creating a shortcode is a great place to start creating plugins as they’re relatively simple and very useful. Find out how to create them with our guide to coding shortcodes in WordPress.


Social Media Plugins
Social media plugins are incredibly popular as they let you display your Facebook, Twitter, or Instagram feed on your site and let your visitors share your content via their own social media accounts.
Learn about the best social media plugins and how to create an online community for your WordPress site.
Gallery and Media Plugins
If you want to optimise the media on your site and display galleries or video feeds, a plugin will make everything look more professional. Find out how to find the best gallery plugins for images or video and how to code your own gallery plugin.
Form Plugins
Adding forms to your site lets your visitors get in touch and helps build a relationship. CodeCanyon has plenty of premium form plugins that will make it easy for your visitors to contact you. Learn how to create a form with the bestselling QuForm plugin.
FAQs on How to Create a WordPress Plugin
Here are the answers to some of the most frequently asked questions about WordPress plugins.
Why can’t I just add the code I need to my theme functions file?
It’s tempting to simply keep on adding code to the functions.php file, and there is some code that should be there.
But if your code is related to functionality in your site, rather than the design or the output of content, then you should code it into a plugin. This means that if you switch themes in the future, you still have that functionality. And you can use the plugin on another site running a different theme.
I’ve added code to my plugin. Why is nothing happening?
This is probably because you haven’t hooked your code to an action or filter hook. Until you do that, nothing will happen.
When I edit my plugin and check my site, I get a white screen. Help!
You’ve probably added some code that’s got an error in it somewhere. PHP is an unforgiving language, and this might be as minor as a semicolon in the wrong place.
Try turning on WP_DEBUG in your wp-config.php file, and you’ll see a message telling you where the error is. Then you can fix it.
When I activate my plugin, I get an error message telling me too many headers have been output. What does this mean?
All this normally means is that there are too many empty lines in your plugin file. Go back and check there are no empty lines at the beginning of the file.
If that doesn’t fix it, try turning on WP_DEBUG.
Where can I find out more about developing plugins?
We have lots of tutorials and courses helping you to build all kinds of plugins here on Envato Tuts+. See if you can find anything that inspires you.


Where can I download plugins for my site?
You can choose from thousands of free plugins in the WordPress plugin directory. You can also buy third-party plugins from CodeCanyon. Always buy plugins from a reputable supplier so you can be sure they follow WordPress coding standards and don’t contain malicious code.
Summary
Plugins will turn your site from a simple blog into a powerful website that includes advanced features and is secure and robust. Try adding plugins to your site today and coding your own to see how you can use plugins to improve your WordPress site.
Here are a few of the best-selling and up-and-coming WordPress themes and plugins available for 2020.
via Pixel Lyft https://ift.tt/aMQBRNG
When it comes to creating an interior design website, there is no better choice than WordPress. For starters, WordPress is free and easy to use. Secondly, it powers more than 30% of all websites online so you can rest assured you’ll be building your website on a reliable platform.


Finally, there are numerous WordPress themes made specifically for WordPress that can speed up the process of creating and launching your website.
Find the Best Interior Design WordPress Themes on ThemeForest
ThemeForest is one of the best marketplaces to find the best interior design WordPress themes. Themes from ThemeForest have attractive designs and they have plenty of customization features.


In addition to that, these home decor WordPress themes they have been optimized to load fast and coded with the best SEO practices in mind so you can rest assured your interior design website template will rank better in search engines.
If you keep scrolling down, you’ll also find the best free WordPress themes for interior design.
25 Best Interior Design WordPress Themes from Themeforest to Try in 2023
Take a look at some of the best interior design WordPress themes that are available on ThemeForest.
1. Entré – Interior Design Theme


Without a doubt, Entré is one of our best interior design WordPress themes. This top-selling home decor WordPress theme stands out with its gorgeous and elegant design.
This interior design portfolio template features 12 beautiful demos, check them out here. If you’re looking for interior design themes to grow your business online, this is for you.
Very good theme for creating a good website. Customer Support is fast and competent. Code quality is good overall. Thank you – User shako502
You’ll be hard pressed to find a similar template as a free WordPress theme for interior design.
2. ArchiPres – Architecture & Interior Decor WordPress Theme


If you’re looking for the newest design themes, check this interior design website template out. ArchiPres is a brand-new decor WordPress theme.
This interior design portfolio template features three unique demos with a fresh design. ArchiPres uses Elementor Page Builder, it’s SEO friendly and it’s fully responsive. You’ll be able to share your home decor ideas through your stunning website.
3. Intervio – Architecture Interior Design Portfolio Template


Intervio is a new interior design portfolio template. This home decor WordPress theme helps you build the best home design website with a minimalist design.
This decor WordPress theme features nine unique demos built with Elementor Page Builder. This interior design portfolio template is fully responsive and retina ready compatible with all browsers. With it, you can build the best home design website.
4. Arcdeco – Architecture Interior Design Theme


This decor WordPress theme has a modern and inviting for an interior design website template. The header area is the perfect place to include a statement photo from your portfolio. You can use the rest of the page to highlight your services and show off your work with this interior design portfolio template.
The home decor WordPress theme comes with the Elementor page builder plugin so you can easily create unique layouts for your website. The theme is also fully responsive and includes a light and a dark version. You can use it as a kitchen design WordPress theme or to create one of the best home design website.
5. Cozy – Interior Design Theme for WordPress


The Cozy home decor WordPress theme has a light and airy design. It comes with 12 amazing homepages, all of which can be imported with a single click. It also includes a number of premade inner pages so you can quickly launch the best home design websites.
The home decor WordPress theme is responsive and has a powerful theme options panel for ultimate customization.
6. Aalto – Architecture and Interior Design Theme


The Aalto, the best interior design WordPress theme, is perfect if you want to put the main focus on your interior design portfolio template. The theme comes with a stunning portfolio layout and it’s fully responsive. It includes 12 premade homepages and a one-click import feature.
You can easily customize fonts, colors, and other visual aspects of the theme. In addition to that, the theme comes with built-in social media feed widgets.
Try to find a free WordPress theme for interior design like this one!
7. Addison – Architecture & Interior Design WordPress Theme


The Addison decor WordPress theme has a clean design paired with elegant typography. The theme offers several demos to choose from as well as a number of premade inner pages. You can use the page builder plugin to easily modify those pages and create unique page layouts. In addition to these features, the Addison decor WordPress theme comes with a built-in cost calculator.
8. Archi – Interior Design WordPress Theme


The Archi design theme has a beautiful design and is packed with features. For starters, it comes with an easy to use page builder plugin and a powerful theme options panel so you can easily customize every aspect of this interior design website template.
It also integrates with other popular plugins like WooCommerce, WPML, Revolution Slider, and others so you can add all the features you need to effectively sell your interior design services. On top of this, the design theme is responsive and includes more than 60 different page layouts that you can use as a starting point for a website.
9. Architecturer WordPress Design Theme for Interior Designer


If you want a decor WordPress theme that has a clean and minimal design, the Architecturer could be the perfect choice for you. The interior design portfolio template comes with 12 pre-made home page layouts, one-click demo import feature, multiple portfolio layouts, and multilingual support.
You can easily build the best home design website with this magical decor WordPress theme. Whether you want to share rustic home decor ideas, or even a blog on how to decorate a home office, you can do it with this versatile template.
10. Dør – Modern Architecture and Interior Design WordPress Theme


This design theme has a dark and dramatic design which makes your portfolio stand out even more. However, you can easily customize the design if you’re not a fan of the dark background. This is one of the best interior design WordPress themes because it’s responsive and has a number of pre-made pages to choose from.
11. Ratio – A Powerful Architecture and Interior Design Theme For WordPress


If you want a range of pre-made pages to choose from, consider the Ratio home decor WordPress theme. It has 15 pre-made homepage layouts, more than 25 portfolio layouts, and 9 shop layouts to choose from. The theme is also packed with shortcodes so you can easily add elements like accordions, buttons, and more. It’s also responsive and highly-customizable.
Not even the best free WordPress theme for interior design can compare!
12. Arcworks — Architecture & Interior Decor WordPress Theme


The Arcworks theme with awesome home decor ideas is retina-ready, fully responsive, and features a clean and professional design. The theme comes with a detailed case study project page so you can share details about each interior design project. You can customize fonts, colors, and more thanks to the powerful theme options panel.
Download this template and see why it’s one of the best interior design WordPress themes.
13. Dessau – Contemporary Home Decor WordPress Theme for Architects and Interior Designers


The Dessau theme has a modern and trendy design. It includes several pre-made pages and comes with an easy to use, drag and drop page builder. The theme is fully responsive, optimized for SEO, and highly customizable. Its versatility can allow you to share your modern or rustic home decor ideas.
14. Ambient – Modern Interior Design and Decor WordPress Theme


The Ambient theme comes with stylish portfolio lists and single project pages so you can present your interior design skills in style. The theme is also responsive and has 12 pre-made homepage demos to choose from. This theme is translation-ready and comes with built-in social sharing options.
15. Maison – Modern WordPress Theme for Interior Designers and Architects


Here’s another clean and minimal WordPress theme for interior designers. The theme has a number of different homepage layouts to choose from as well as a number of pre-made inner pages. It’s fully responsive and easy to customize.
16. Allston – Contemporary Architecture and Interior Design Theme


The Allston interior design theme has a stylish and elegant design. It has several premade pages so you can easily create your homepage, services, portfolio, and other necessary pages. The theme is highly customizable and responsive. The home decor WordPress theme also comes with a number of icon packs to build one of the best home design websites.
17. Die Finnhütte – Modern Architecture and Interior Design Theme


This home decor WordPress theme has a modern and sharp design. It offers unique portfolio and homepage layouts which make your interior design projects stand out. The interior design portfolio template is fully responsive and easy to customize.
18. Inteco – Architecture & Interior Design Website Template


The Inteco theme has a clean and simple design. It includes a powerful page builder so you can easily create a unique layout for your page. The theme looks great no matter which device your visitors are using and you can customize every aspect of your website.
You can download the best free WordPress theme for interior design and you wouldn’t get as many features as this premium template has.
19. Ollis – Architecture Agency & Interior Design WordPress Theme


The Ollis theme is another clean and minimal theme packed with useful features. It comes with a number of professionally designed homepages, amazing animations, 20+ unique shortcodes, galleries, blogs, testimonials, and more. You can even use it to share tips on how to decorate a home office.
In addition to that, the theme includes extra pages with elements such as headers, icons, lists, tabs, sliders, and others. Taking all of this in mind, you can see why this is the best interior design WordPress theme.
20. Interior Design – Architecture And Interior Decor WordPress Theme


This simple and flexible interior design portfolio template comes with several different portfolio styles and blog layouts. It also integrates with WooCommerce and comes with a drag and drop content composer. It was also optimized for SEO so you can put together the best home design website.
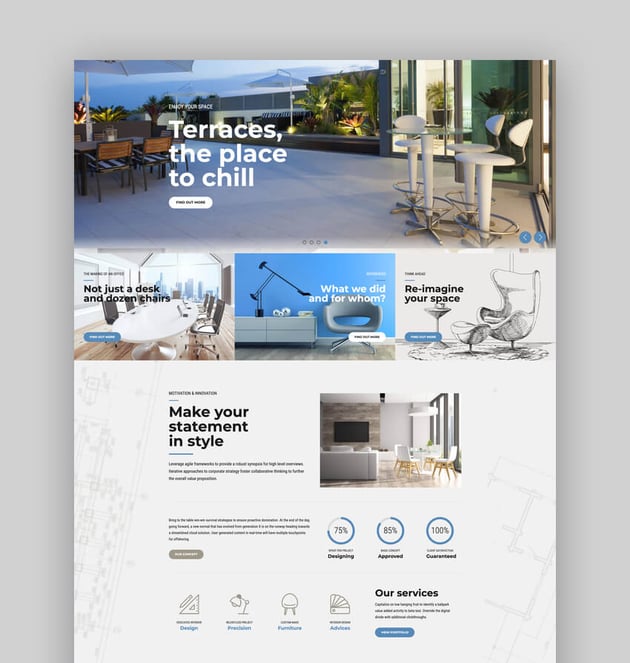
21. Interrio – WordPress Theme for Architecture and Interior Design
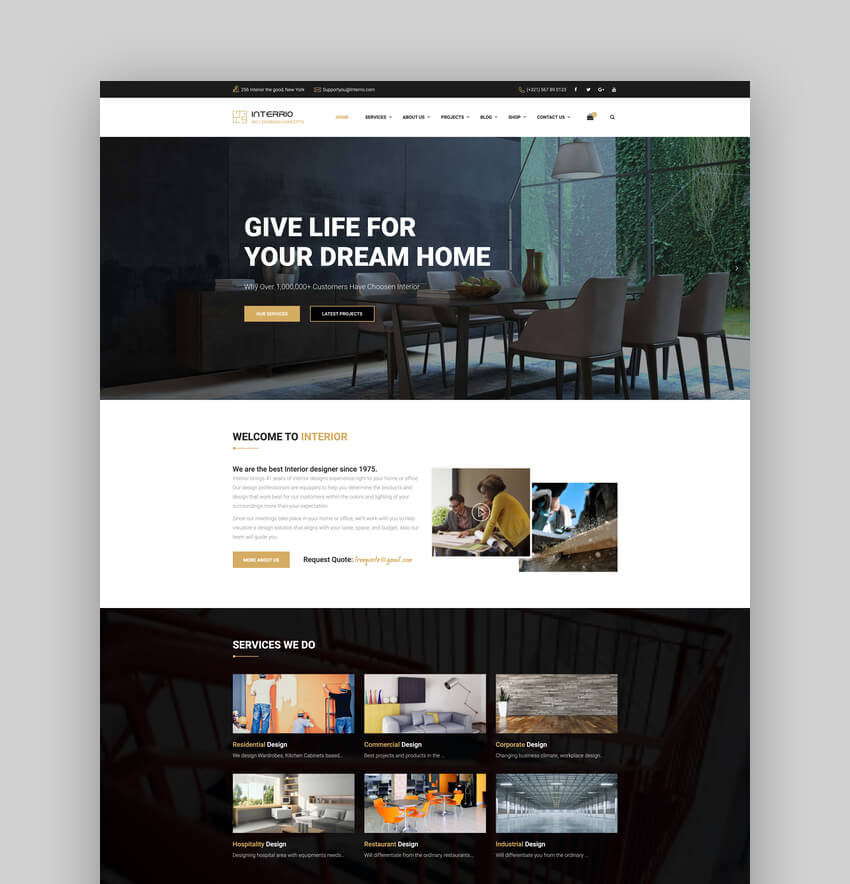


If you’re looking for an easy-to-use theme, consider Interrio to create a best home design website. It comes with a one-click installation feature so you can easily import the premade demo. It’s fully responsive, optimized for SEO, and retina-ready. Truly, it’s one of the best interior design WordPress themes out there.
22. Interico – Architecture & Home Decor WordPress Theme


The Interico home decor WordPress theme has a stylish and elegant design. It’s fully responsive and highly customizable. This best interior design WordPress theme includes 28 pre-made demos which can be installed with a single click which speeds up the design process.
It’s perfect to let visitors know your best rustic home decor ideas or teach them how to decorate a home office.
23. Crystalo – Architecture and Interior Design WordPress Theme


The Crystalo theme has a trendy design. It has a number of premade homepage layouts as well as pre-designed inner pages. The theme offers an extensive theme options panel where you can customize every aspect of your website.
24. Loft – Interior Design WordPress Theme


Loft is a flexible interior design portfolio template. This decor WordPress theme looks great on mobile devices thanks to its responsive design and retina graphics. Loft comes loaded with nine demos, various page types, wide and boxed layouts, unlimited color schemes, great fonts, icons and more.
25. Moora – Architecture and Interior Theme


The final item in the list of the best interior design WordPress theme is here! Interior design is always up-to-date. So are the design themes from ThemeForest. Moora is a recently added and modern interior design portfolio template.
This home decor WordPress theme features eight beautiful homepage demos for different purposes. Do you need interior design website templates compatible with WooCommerce? This one will help you build a top online store.
5 Best Free WordPress Themes for Interior Design
Now that you’ve seen the best interior design WordPress theme, it’s time to take a look at the best free WordPress themes for interior design.
If premium interior design themes aren’t an option, there are a number of free interior design themes that you can download from the official repository. However, keep in mind that free WordPress theme for interior design are limited in terms of functionality and customization options.
They also offer no support from the developer so if you run into any issues, you’ll need to hire a developer to fix them or spend a lot of time searching for a solution. That said, here are some of the top best free WordPress themes for interior design.
1. VW Interior Designs – Best Free WordPress Theme for Interior Design


This free WordPress theme for interior design has a simple design. You can customize fonts and colors, highlight your interior design services, and include a gallery to use it as an interior design portfolio template for previous projects.
2. Interior Designs – Free WordPress Theme for Interior Design


This home decor WordPress theme has a colorful design with feature boxes on the homepage to highlight your services. It’s responsive and you can customize fonts and colors to use it as a fine interior design website template.
3. Kitchen Design WordPress Theme – Free WordPress Theme for Interior Design


If you specialize in kitchen designs, this kitchen design WordPress theme might come in handy. It has a clean design and is responsive. You can create a gallery for your previous design projects and customize your fonts and colors. Showcase your work with this kitchen design WordPress theme.
4. LZ Interior Decor – Free WordPress Theme for Interior Design


This free interior design website template is fully responsive and uses a creative purple color scheme. However, you can change it to any color you like. This is one of the best free WordPress themes for interior design because it’s translation-ready and optimized for SEO.
5. Interior Lite – Best Free WordPress Theme for Interior Design


This free interior design theme integrates with popular plugins like WooCommerce and NextGen Gallery so you can showcase your previous interior design projects. The interior design website template is also responsive and you can customize fonts and colors to your liking.
5 Quick Tips for the Best Home Design Websites
An attractive interior design theme is only the first step in creating the best home design website. Here are a few more tips that will help you create a standout website for your interior design agency.
1. Include a Portfolio
Clients looking to hire an interior designer will be interested in your styling portfolio. After all, they want to know that your aesthetic matches theirs. As such, be sure to include a portfolio on your interior design website.


2. Don’t Forget Testimonials and Press
Your website should also include testimonials from past clients as well as links to any press mentions and features. This will help build trust with potential clients and they will be more likely to hire you.
3. Make it Easy to Get in Touch
Make it easy for potential clients to get in touch with you. Include your contact page in the main navigation and don’t forget to include calls to action throughout your website that point visitors to your contact form.
4. Be Specific With Services You Provide
Keep in mind that people won’t always be looking for a full-blown home makeover. Sometimes, they will need specialized services like a kitchen or bathroom remodeling. As such, be sure to list all the services you provide on your website.
5. Optimize for Local SEO
This will help you get found when someone searches for a local interior design company. You can do this by creating a Google My Business profile and linking your website to it.
You can also improve your site’s SEO by installing an SEO plugin that will give you recommendations for optimizing your content. All you have to do then is make sure each post and page is optimized for the keywords you want to rank for.
Learn More About WordPress
We know WordPress can seem intimidating if you’re just starting to use this awesome platform. But don’t worry, here I have some resources that might help you with your WordPress website.
Additionally, you can check our fantastic course: A Beginner’s Guide to Using WordPress and our Tuts+ YouTube channel:
https://www.youtube.com/watch?v=videoseries
Explore More Awesome WordPress Themes
I hope you’ve liked this hand-picked selection of the best interior design WordPress themes. If you’d like to discover more awesome themes and resources, we’ve got this for you:
Create a Great Interior Design Website Quickly With the Best Interior Design WordPress Theme
As you can see, there is no shortage of beautiful interior design WordPress themes to choose from. What’s more, thanks to the one-click import functionality, you can create your website pretty quickly.
Get started today by visiting ThemeForest and find the perfect interior design WordPress theme for your website.
Editorial Note: This post has been updated with contributions from Dacia Egurrola. Dacia is a staff writer with Envato Tuts+.
via Pixel Lyft https://ift.tt/jy2PXwN
There are many reasons to become a freelance web designer; the freedom to work where you want, when you want, and with whomever you want are big ones. Freelancing can also enable you to make more money than if you were tied to a single employer.
That said, freelancing isn’t without its risks.
Many freelancers know what it’s like to go through cycles of feast and famine. It can take a while (as well as a lot of hustling) before you get to a point where things feel steady. Even then, other disruptors can cause business to dry up.
One way to safeguard yourself as a web designer is to diversify your earnings. By creating multiple revenue streams — including recurring and automated revenue — you won’t be as susceptible to freelancing famine or disruption.


In this post, we’re going to take a look at 15 ways to diversify your income.
15 Ways to Diversify Your Revenue Stream If You’re a Web Designer
You could be a 10-year freelancing veteran and it would still be a good idea to diversify your revenue as well as to open up recurring revenue streams.
For starters, it would make you less dependent on services-based earnings. Secondly, it wouldn’t feel as earth-shattering to lose clients since you’ll have plenty of other revenue streams to fill in the gaps. Plus, every side hustle you get involved in will breathe new life and passion back into your work.
Income diversification can lead to some amazing things. Just make sure you focus on revenue streams that make sense for you as a web designer. Here are some ideas to get you started:
1. Expand Your Web Design Services
Some people don’t like the idea of doing anything other than the job they set out to do. As a web designer, you won’t have to.
For instance, if you currently build eCommerce websites, consider other niches you’d like to build websites for. There are many kinds of businesses and individuals in need of websites.
You won’t need hands-on experience designing for other niches in order to make this leap either. ThemeForest has thousands of high-quality themes for every niche that will help you get acquainted with the needs for other types of sites:
Also think about niching down in a specialty that pays more. For instance, if you can make a name for yourself as a UX designer or researcher, they tend to make more money than traditional web designers.
You could also look into developing mobile apps for your existing niche. That could be an especially lucrative opportunity in a field like eCommerce where many companies invest in both a website and app.
2. Create Turnkey Websites
You don’t see many people selling pre-made websites nowadays, but I think it could be a worthwhile venture considering how many people are looking to cut costs right now.
Essentially, you’d set up a store on your own website where people could buy hosted websites that you built. You’ll fill in as many of the details on the site without getting too specific. Customers would then pay a monthly or annual fee to “buy†the site, quickly customize it, and publish.
3. Flip Websites
This option is similar to turnkey websites in that you’ll be building complete websites. However, flipping websites is similar to flipping houses. You’ll need to put a lot of work into them — we’re talking tons of SEO and affiliate linking. Plus, you’ll have to wait long stretches so the site has enough time to build up its link juice in search engines while also bringing in money from affiliate marketing.
So if you’re looking to sell higher-ticket websites without the hassle that can come from managing clients through the process, this could be an interesting avenue to pursue.
4. Offer Web Development Services
You don’t have to choose between doing design and coding.
If you enjoy digging into the code of a website — whether it’s to enhance what you’ve designed or to code it from scratch — you have the option of working as a web developer as well. Or you could increase your rates and market yourself as a web designer/developer hybrid.
5. Provide Graphic Design Services
Businesses need more than a website in order to reach their audience and stay in touch with customers. While they can hire a graphic designer to help them with creating these other assets, they’re going to get more consistent results if the same designer works on everything.
If you’re interested in graphic design, this would make for a great offshoot of your web design services. Your clients will need things like:
- Logos
- Social media graphics
- Email marketing graphics
- Business cards
- Flyers
Whether you’re new to graphic design or you prefer to streamline your workflow as much as possible, Envato Elements is going to be a useful resource:
There are millions of digital assets here — from stock content to editable templates — that will help you get your clients’ graphic designs completed and out the door in record time.
6. Sell Website Maintenance Packages
WordPress websites, in particular, require a lot of upkeep. While WordPress users have the option of paying more for managed web hosting, there’s only so much they can do to help in this regard.
On the other hand, a web designer they know and trust offering to help with monthly maintenance would be attractive to many clients. The level of maintenance you offer will depend on the type of website it is and what kind of budget your client is working with. Regardless, you might find yourself doing things like:
- Website backups
- Software and plugin updates
- Uptime monitoring
- Performance audits and optimization
- Security monitoring and patches
- Broken link fixes
- Google Analytics monitoring
You could also offer services related to content editing, SEO improvements, responsive checks, and more.
By the way, you can streamline a lot of this work. One way to do it is with a tool like ManageWP. Rather than log in and out of each of your maintenance clients’ websites, you’ll have a single dashboard to manage them all from:
Another option is to outsource the work to WP Buffs. It will be white labeled, so your clients will never know that an external team of experts is handling their maintenance.
7. Manage Web Hosting
If you find a web hosting company that you know and trust, and that offers a resellers’ program, think about leveraging it. SiteGround, for instance, is a web hosting company that offers reseller hosting:
The best way to do this is to convert your web design service that clients pay once for into an all-in-one website service that they pay a monthly or annual subscription fee for.
So what you’d do is charge them a recurring fee that covers the cost of:
- Their web hosting plan (which you’ll set up and manage for them)
- The website you’re going to build for them
- The ongoing maintenance services you’ll provide
This is a great option if you want to differentiate yourself from other web designers. Rather than offer a one-time service to clients, you handle all of their technical website needs as well.
8. Offer Optimization Services
There’s more to website maintenance than just ensuring the site loads quickly and that WordPress stays up to date. For a website to be worthwhile and profitable over the long run, it has to evolve alongside its users’ needs and expectations.
There are a couple of methods that will enable you to do this.
The first is search engine optimization (SEO). As a web designer, you’ll be in the best position to help clients manage technical SEO (basically all the stuff you’d do in a maintenance package) plus on-page SEO.
The second is conversion rate optimization (CRO). This might already be in your wheelhouse. If you like running A/B tests, pouring over Google Analytics data, and analyzing heatmaps, this could be a great way to create a new revenue stream for your business.
9. Do Website Consultations
Find what you’re good at and then offer up your expertise to clients (and non-clients) who need it. There are various ways to do this via consultations. It all depends on your area of expertise.
For instance, if you’re a website maintenance guru, you could sell technical SEO audits. If you’re more interested in the creative side of website design, you might be better suited to doing website audits and then pitching redesign/rebranding packages to your clients.
10. Coach New Freelancers
There are new designers entering the field every day. While there are plenty of online resources at their disposal — like the kind of tutorials, courses, and guides you find on Tuts+ — coaches can provide practical knowledge and business acumen that doesn’t easily fit into these materials.
If you enjoy one-on-one training or coaching, consider launching a side hustle where you do just that for fledgling designers.
11. Develop WordPress Themes
Have you ever felt like there’s a gap in the WordPress theme market? With how quickly web design trends change, that wouldn’t be a surprise.
Plus, every time Google rolls out a new algorithm update, webmasters are always scrambling to update their websites with features that allow them to rank. We need more people who can develop great-looking themes that help websites perform well in search results.
You don’t need to go all in and launch a WordPress theme agency in order to make money doing this. What’s important is that you develop high-quality themes and then build good relationships with users via updates and support. This will allow you to generate tons of positive reviews and press around your work.
Your reputation and reviews will matter more to users than the quantity of themes you’ve built.
12. Create WordPress Plugins
WordPress plugins offer another way for you to develop products for WordPress. One option is to sell specialized plugins that offer a solution that few others can via a site like CodeCanyon:
Another way to do this is to develop plugins and make them available for free on WordPress.org.
In order to make money from them, you’ll need to build a landing page where you sell the premium version of the plugin. You can entice users to the upgrade by offering enhanced support or providing extra features.
13. Sell Digital Assets
There are other things you can create and sell beyond WordPress products. Brands and even other designers are always in need of stock content and templates. For example:
- Photos
- Illustrations
- Icons
- Videos
- Music
- Sound effects
- Textures or patterns
- Fonts
- Animations
Just as you might use Envato Elements to download resources for your web design work, you can use the same platform to sell your creations.
14. Create Video Courses
One of the great things about the world we live in today is that you don’t need to be a great videographer in order to create your own video courses or tutorials.
The first thing you need is a tool that enables you to film your screen. I prefer to use WeVideo as there’s a ton of flexibility in what you create and how you create it. The editor is also easy to use.
Then you need somewhere to host and monetize your video course. While you could use something like YouTube, you’d be dependent on them and their advertisers to help you make money.
I think it’s better to use a course plugin or even a third-party course platform like Teachable if you want to go the self-hosted route. Or if you want to leverage a course platform that already has tons of traffic and users, you can submit your courses to a site like Udemy.
15. Do Affiliate Marketing
This last option will require you to be doing some form of marketing. For example:
- Blogging
- Social media
- Newsletters
- Podcasting
You’ll then need to hunt down affiliate partnerships that make sense for the kind of content you’re creating.
As a web designer, you’ll likely be writing or talking about design, freelancing, or niche-specific topics. Your affiliate partnerships should fall into those categories if you want your links and ads to get clicks and convert.
Conclusion
There are so many other ways you can diversify your income as a web designer. Manage clients’ social media accounts. Do wedding photography on the weekends. Drive for Uber.
However, I wanted to give you a list of revenue streams that would naturally branch off from the work you do as a web designer. And the 15 suggestions above are a great place to start.
Trust me, it’ll be much easier for you to start generating more income if you can tap into your existing or former client base than if you’re having to start from-scratch. Plus, doing things that are in your creative wheelhouse means you won’t have to work so hard or spend as much time doing them. Efficiency is key in keeping your profit margins high!
via Pixel Lyft https://ift.tt/wNSyjAK
Author
Write something about yourself. No need to be fancy, just an overview.
Archives
April 2023
March 2023
February 2023
January 2023
December 2022
November 2022
October 2022
September 2022
August 2022
July 2022
 RSS Feed
